How to Change Font on WordPress In 2023
If you are new to WordPress, you may be unaware that you can personalize many parts of your website. One of these customizable features is the font type and size. This article will show you How to Change Font on WordPress from the default Arial Black font to something more readable and stylish like Georgia or Verdana. This post can help no matter what theme or plugin template you use for your site design.
What’s the point of changing the Font on WordPress?
What’s the point of changing the Font on WordPress? You might be wondering why you should spend time and effort to change the Font.
There are a lot of reasons, but I’ll list someones:
- It can make your blog more professional-looking.
- It can make it easier for readers to read the content.
- It helps you to stand out from other blogs.
- You don’t have to use the same Font as everyone else.
The world is full of choices. You can change anytime you want. So what’s stopping you from making that change right now?
How to Change Font on WordPress
Best Way To Change Fonts In WordPress Themes
Changing the fonts in your WordPress theme can be easier if your theme has a font customization feature. From the theme’s customize option, you may change your Font. Follow my instructions to change the Font.
Step 1: Navigate to the Appearance section >> Customize.
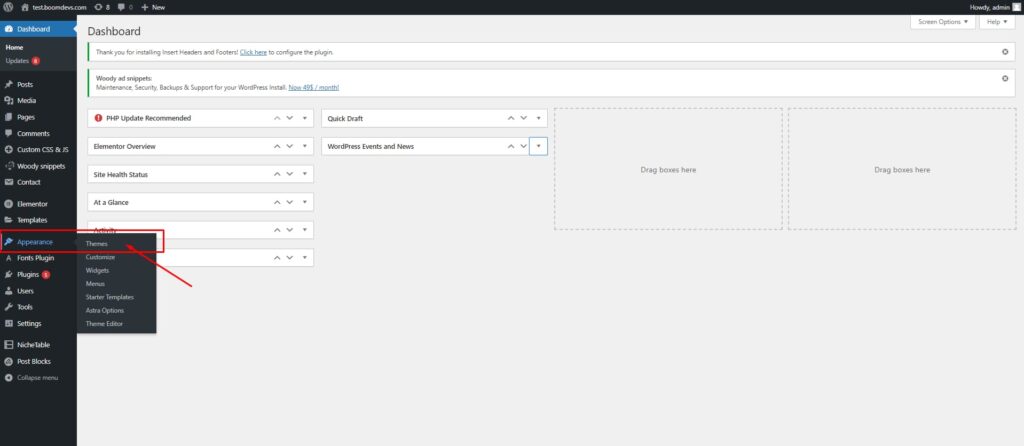
Step 2: Find the font/typography options.
Now You have to find the font/typography option. You’ll probably have to go through all settings because each theme does not have the same font/typography settings. In my case, I’m using the Astra Theme, and the typography option is under Global >> Typography Option.

You might be able to locate it elsewhere. As a result, keep looking until you find it.
Step 3: Select the Font and save.
You’ve come to the end of the process. You have to select a font and save it. You may notice that the options are split by content type depending on the theme. The Base Typography and Headings Typography options are available here. You may notice something else.

Change the Font that you’d want to use. You can also see a live preview. After you’ve chosen a font, you may now publish it to save the changes you’ve made.
Add Google Font manually to your website.
If your theme doesn’t include a typography change option, you can do it manually. You will need some coding skills to add Google Fonts to your website manually. Otherwise, you may skip this step and go straight to the next one, where I have told you how to change the Font using plugins.
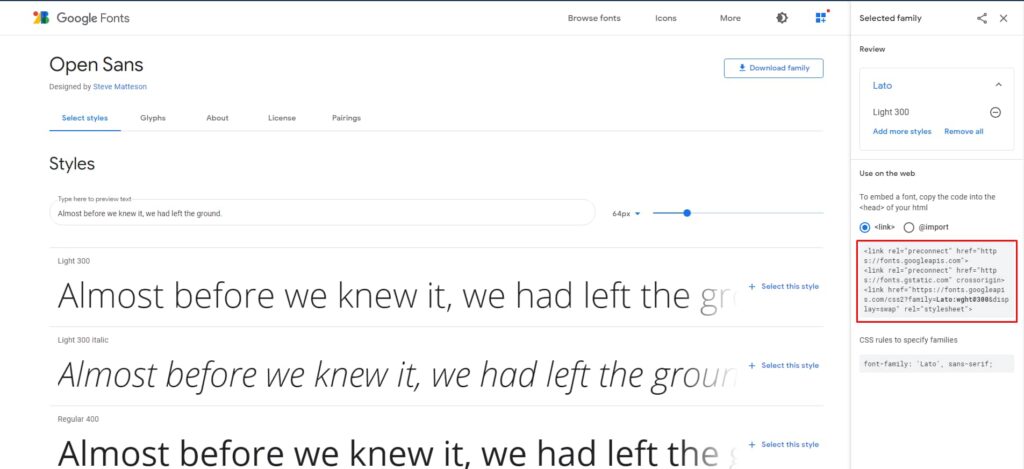
Step 1: Select the Font
First, go to Google Fonts and select the Font with the style you want to utilize on your website. After choosing the Font click the top right corner, as shown in the figure. Then just copy the link, just like I did.
https://fonts.googleapis.com/css2?family=Open+Sans&display=swap
Step 2: Past the code to the function.php
Now go to your hosting account and open the function.php file. And paste the following code, but replace the link of my Font with the URL to your Font that you will obtain from Google Fonts.
function add_google_fonts() {
 wp_register_style( 'googleFonts', 'https://fonts.googleapis.com/css2?family=Lato:wght@300&display=swap');
 wp_enqueue_style( 'googleFonts');
}
add_action( 'wp_enqueue_scripts', 'add_google_fonts' );
Step 3: Adding the Font to Your Stylesheet
Go to style.css and paste the code there, or use the custom CSS option. The font family should be changed. This is also available through Google Fonts.
body, .h1, .h2, .h3, .h4, h1, h2, h3, h4 {
font-family: 'Open Sans', sans-serif;
 }
You will see that your Font has changed after pasting this code. You can change your Font this way. But Make a backup of your site before beginning this step for your own protection. Also, if you don’t have any coding experience, you should skip this process.
Change Font on WordPress with Plugins (The most straightforward way)
Using a plugin is the simplest way to change the font in WordPress. If you are a non-technical person who wants to change the Font, but the theme does not allow you to do so, you can use a plugin to do so.
So let’s take a look at how to change the Font on WordPress with a plugin. I am using Fonts Plugin | Google Fonts
Step 1: Install the plugin.
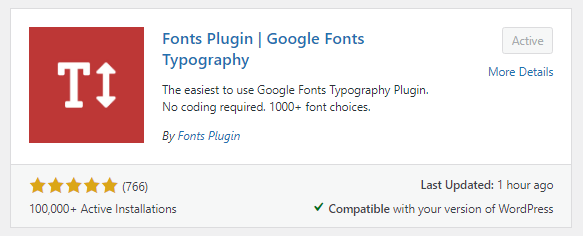
Go to add a new plugin and Install the Fonts Plugin | Google Fonts Typography Plugin. Activate the plugin when it has been installed.
Step 2: Choose the font family.
After you’ve installed it, go to the customizer area of WordPress and look for the Font Plugin Option. Now select Font Plugin>> Customize Font from the drop-down menu. It will take you to your theme’s customizer option. To change the Font, go to the Basic Settings. Simply select the Font and press the save button. You can go to Advanced Setting to change the Font of a specific area such as the content, sidebar, or footer. You’ll find all of your options here.

Hosting Your Own Font :
You might have your own unique fonts that you’d like to use on your website. Now, there’s a question: how do you use a custom font, correct?
There is also a possibility to use your own custom font, so don’t worry. You’ll also need a basic understanding of coding and access to your hosting account for this procedure. Follow my instructions if you have both requirements.
Step 1: Download or choose the font family
You must first decide which Font you will use as a custom font. To demonstrate how to do the process, I’m using a Google font for now. You can, however, use your own or a paid font. I’m planning to use the Roboto font. So, first, let me download the entire font family.
Step 2: Upload the Font on your hosting.
Navigate to the public.html file in the cPanel. You can see all of your website’s files there. Now navigate to the theme folder. You should now be able to see the Font -named Folder. If it doesn’t already exist, make one and name it fonts. After you’ve created the folder, you’ll need to upload the Font you wish to use.
Step 3: Integrate your Font with CSS
It’s time to integrate your Font with CSS now that you’ve uploaded it. Navigate to the theme customizer, then to the additional CSS or custom CSS section, then paste the CSS, which is provided below.
@font-face {
 font-family: ‘Lato';
 src: url( “fonts/Lato-Medium.ttf”) format(‘woff’); /* medium */
 font-weight: normal;
 font-style: normal;
}
After pasting the CSS, you’ll need to modify it a little. The CSS is broken into four pieces, as you can see. Font-family is one of them. I’ve listed the Font’s name here. You must change this name with the name of your font.
Another one is the src: url, which must be replaced as well. Just copy the path URL of your Font and replace it with my URL.
Font weight and font style are the other two options. If you need to use the bold version of your Font, simply replace the normal word with bold. (font-weight: bold; | just like this)
After doing this, you need another CSS for change. Now past the below CSS, which is given below.
body, h1, h2, h3, h4, h5, h6, p {
font-family: 'Lato', Georgia, serif;
}
Replace the font-family name with your font name. And you can see the changes now.
Warping Up
This post has shown you four different ways to change the font on your WordPress site. Whether you are looking for a simple and straightforward way that will allow you to customize the fonts even further, we hope these techniques help! If you are a non-techy person, then my recommendation is to use the plugin if you cannot do the 1st method.
Which method did you find most helpful? Let me know in the comment section.
You can read the following articles also :
7 Best WordPress Themes For Personal Branding
How to Make WordPress Site Private in 2021

Author: Shamiul Bishal
BoomDevs' Head of Content & SEO Analyst. Enjoys writing about the things I've experienced. Skilled in SEO, WordPress, HTML, Social Media Optimization, and Content Writing.