
How to claim Pinterest on WordPress (2023)
Besides old traffic, Social Platforms are the best medium to bring new traffic to your WordPress website. According to Hootsuite, Pinterest is the 14th largest social media among Facebook, Twitter, TikTok, etc which can bring a lot of organic traffic to your website. Each month 250 million visitors come to Pinterest and 83% of visitors to the U.S.
You should definitely verify your website on Pinterest and reap the free benefits if you have not already. You may be wondering why you need to claim your website while other social platforms don’t. Fortunately, We’re going to cover why and how you can claim Pinterest on WordPress in this post. Let’s keep reading.
Why do you need to verify your WordPress on Pinterest?

Pinterest has its own function which is when anyone shares images or videos on Pinterest from your website, it will be shown with the domain name and follow button under the pin which can incredibly increase your traffic.
Having a professional look is also a reason. Pinterest is one of the best platforms for getting ideas and inspiration, and it has countless active users. By verifying websites with Pinterest, your brand will look more professional and you will be able to grow your audience.
Lastly, you can also use Pinterest Analytics to learn more about visitors after verifying your website. It helps us understand audiences and performances better.
The benefits of claiming your website on Pinterest
The benefits you can reap from claiming your website on Pinterest can be quite significant including:
- A noticeable & clickable URL of your website is located on the top of your profile, which helps to drive traffic to your website.
- Allows for observing what users save.
- A Business account is needed to claim the website, and a business account gives you access to new and upcoming features.
- Analytics that help you understand what your target audience is more likely to see.
How to Easily Verify Your WordPress Site With Pinterest
Opening an account on Pinterest won’t get you traffic. It is true that Pinterest attracts traffic easily, but that does not mean everything will be in once you open an account. Developing your account is the key to getting traffic. To get started, you must verify your site on Pinterest. There are several steps involved in verifying process. Here, I’m going to describe each step that will assist you in setting up a professional account.
Step 1. Check whether you have a personal or business account.
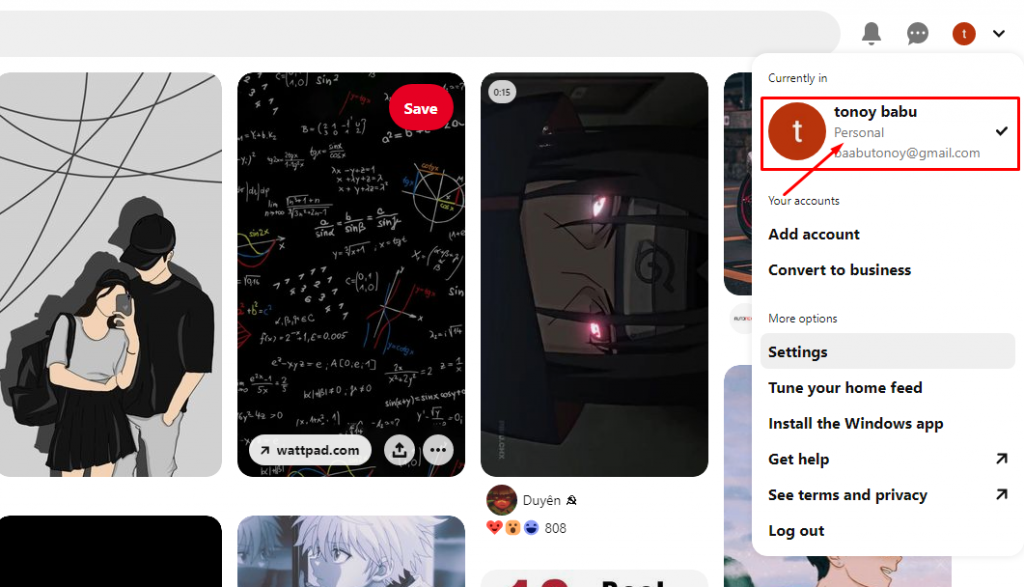
In order to proceed, you must know one thing first. Is your account personal or business? If your account is personal then you have to convert your personal account to a business account. Through this, you will be able to use all pro tools, such as ads program, analytics, etc. The business account is easy to set up and it’s totally cost-free.
Step 2. Upgrade Your Pinterest Account to Business
As I told in the upper section it is essential to convert from a personal account to a business account in order to receive all the benefits mentioned on the top, such as ads, traffic, Pinterest insights, boosting brand authority, etc.
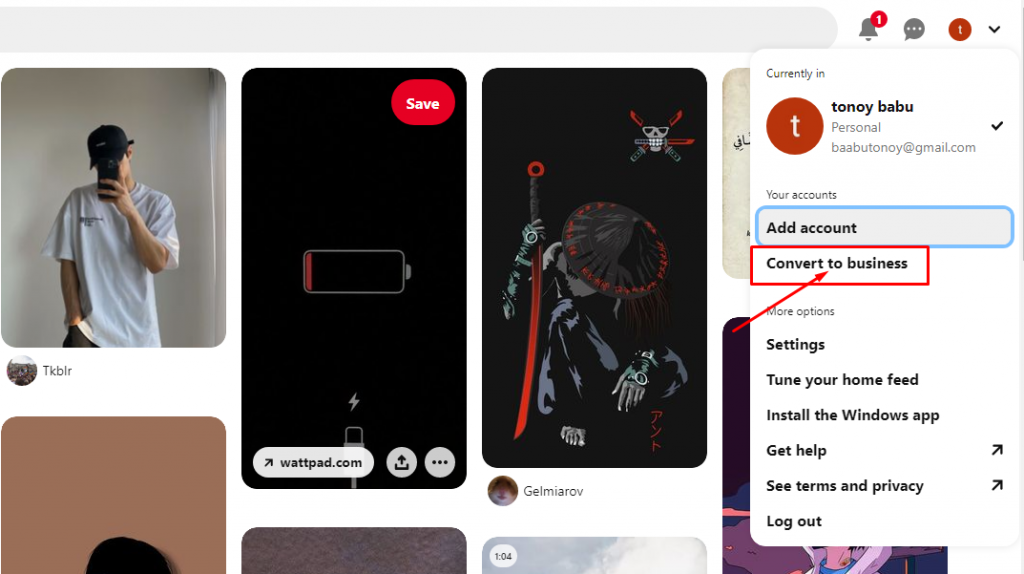
To convert to a business account you have to click the down arrow at the top. Then next, click on the “convert to business” option.

Now you will see a table that will show you features between the personal account and business account. Through the click upgrade button, these options will become available.
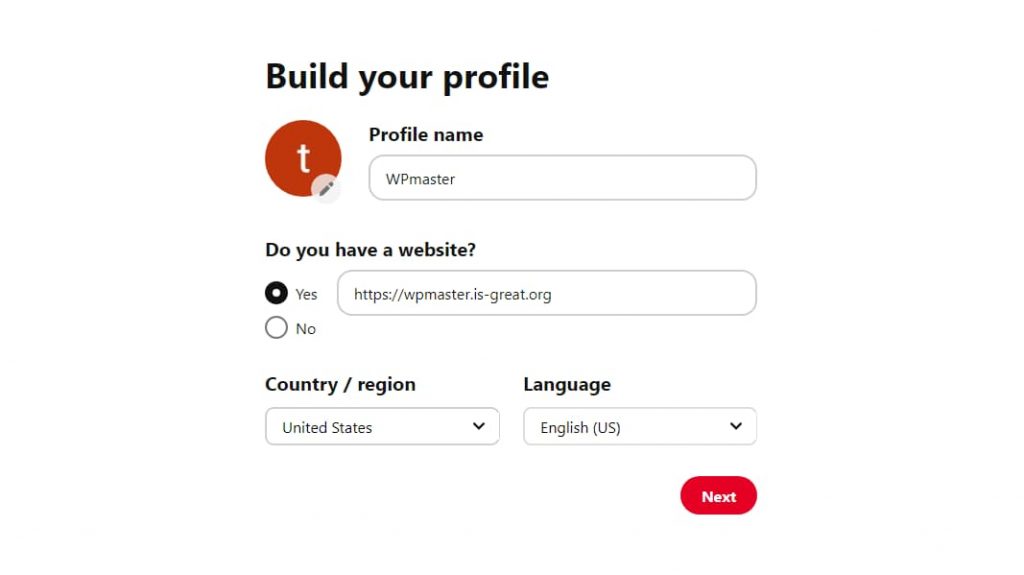
Now it’s your turn to fill up the business details, such as brand name, country name, website URL, and language. After filling up all these details click the “NEXT” button.
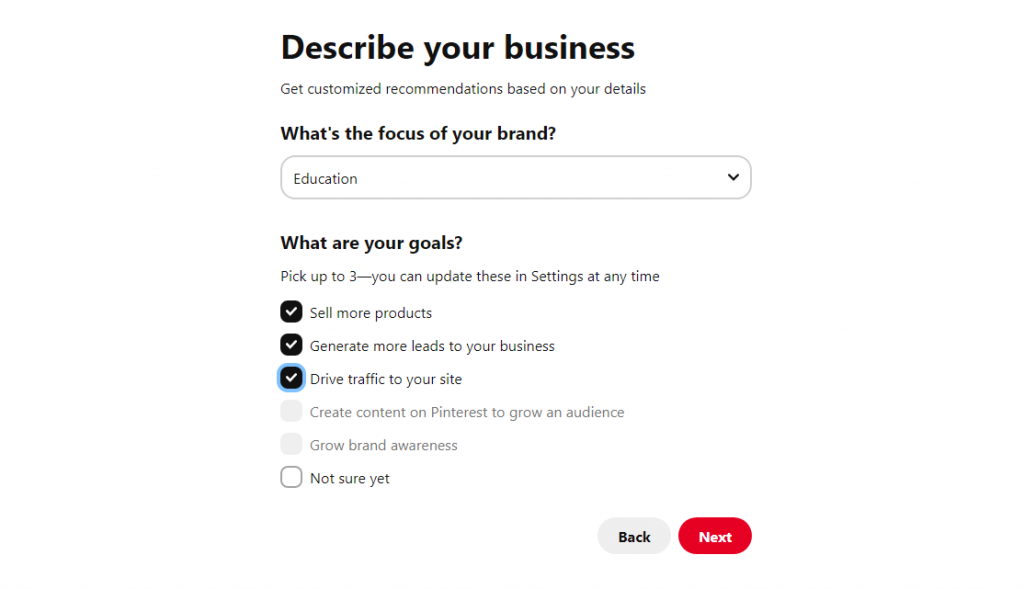
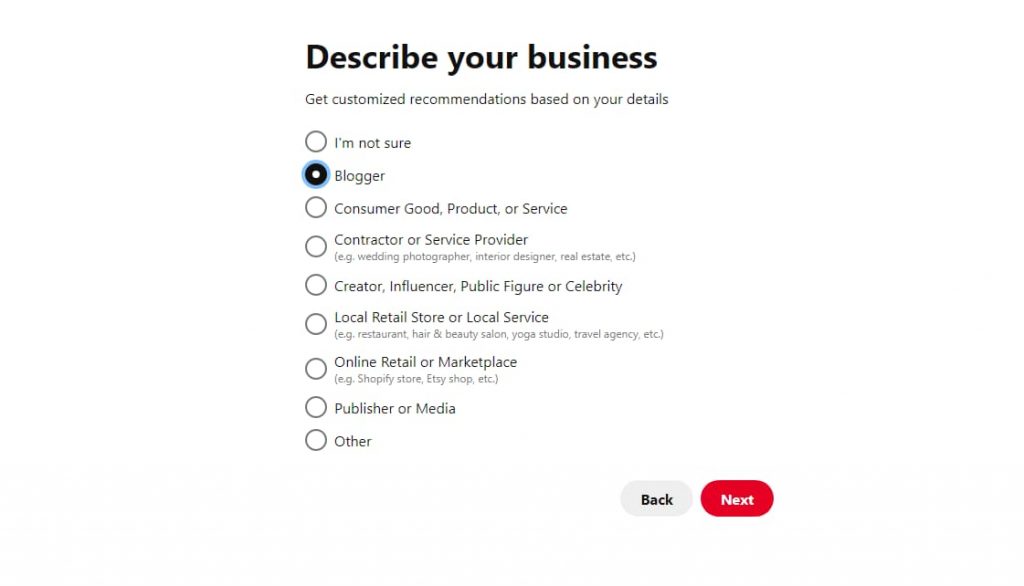
Next, you will see an option which is “Describe your business”. Now you have to describe your business and goals. These will be helpful to get more sales, drive traffic, and generate leads for your business. After selecting your option, click the ‘Next’ button.
Now you can see an option on the image, which is about ads running. If you are interested in running ads on Pinterest then select “yes”, in our work purpose now we are not selecting “NO”. Click NEXT.

Due to the fact that I am doing a quick tutorial on how to claim Pinterest on WordPress, I have selected the 2nd option which is “CLAIM YOUR WEBSITE.”
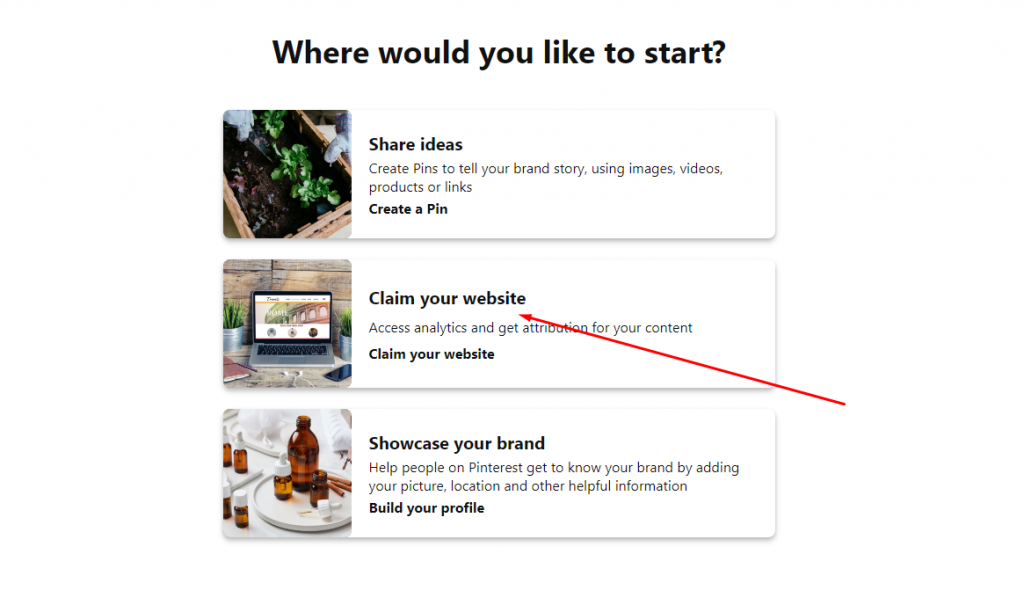
Now it’s your turn to know how to claim your website on Pinterest.
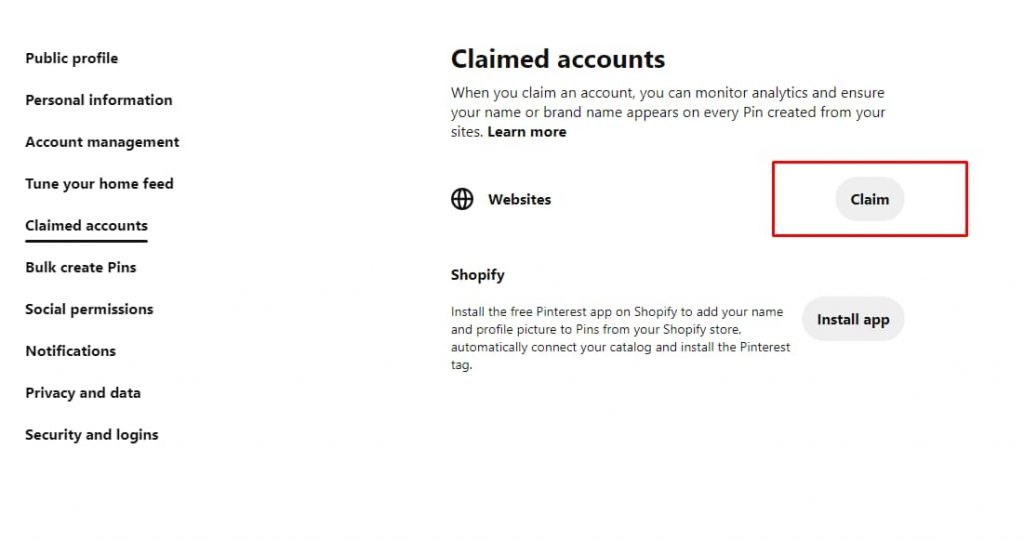
Step 3. Claim Your Website on Pinterest
For Claim, you have to click the claim option that is next to the website. Once you click the claim option, you will be taken directly to the claim setting page.
After clicking, you will see a popup that gives you 3 options to choose from.
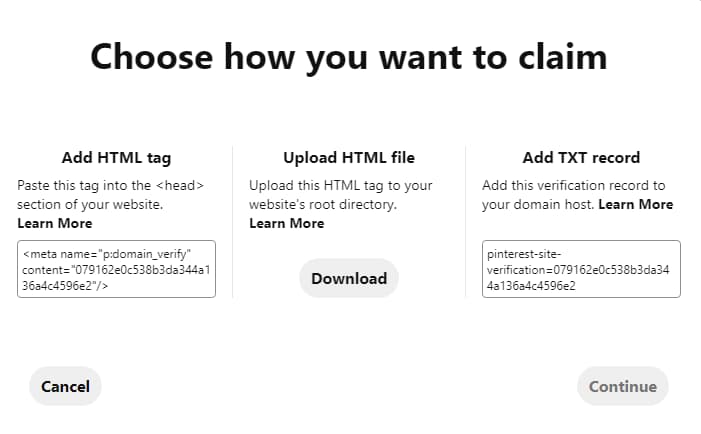
Of the three options “Add HTML tag” is easy that’s why we are going to choose “Add HTML tag”. It’s totally your choice if you want to go with another option then you can.
Step 4. Add HTML Tag to Your WordPress Website
You can add HTML tags to your WordPress website in a few ways. First, I will show you How to verify Pinterest via Theme editor. For this, if you know to code it will be easy for you. But that doesn’t mean you have to learn code. It’s ok if you don’t know the coding. Just follow my steps, and you will do it easily. So, Let’s jump on it.
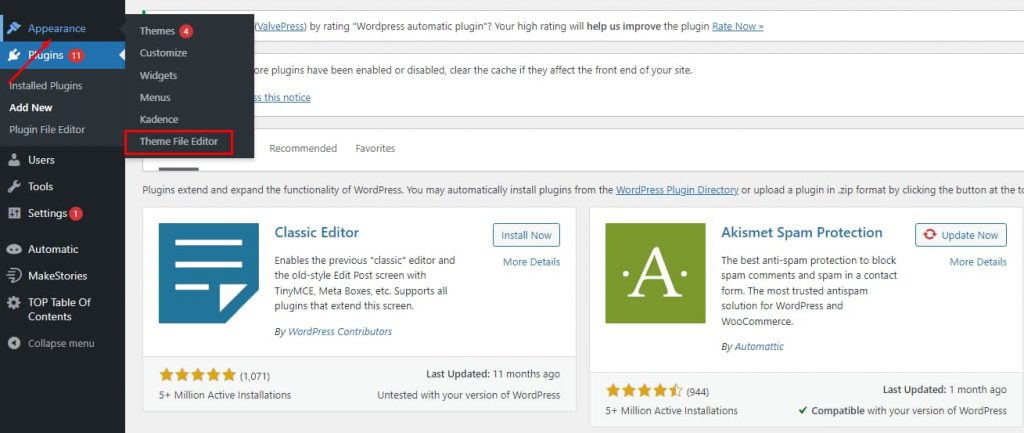
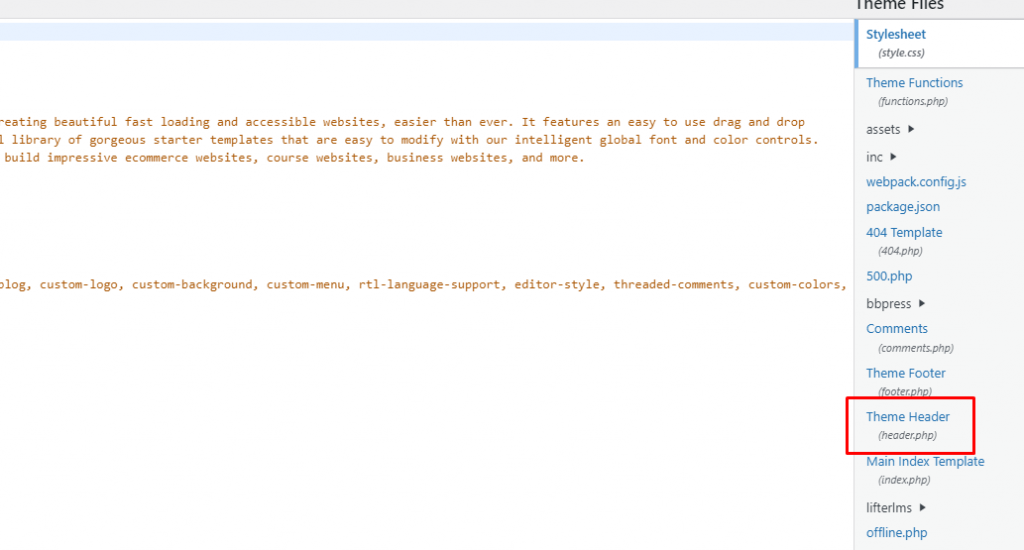
First, go to your website Dashboard, and click Appearance >> Them File Editor. A new interface will appear. After that find the “Header.php” file. You can find it on the right side of the corner. Click on that.
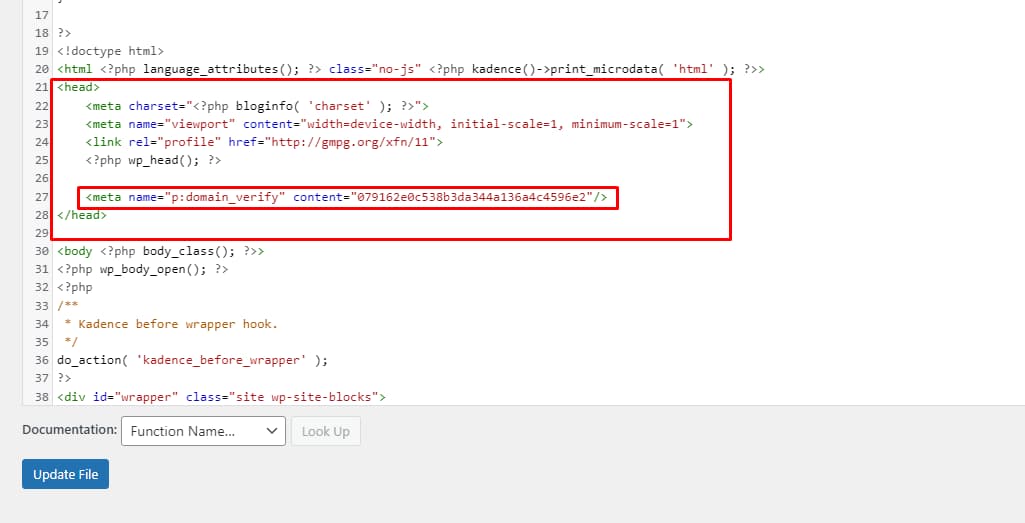
After clicking it will show you this interface, find out the head tag, and carefully notice where it started and finished. After find out, paste the “HTML Tag” before the closing tag ( ). When all is done click on “Update file”
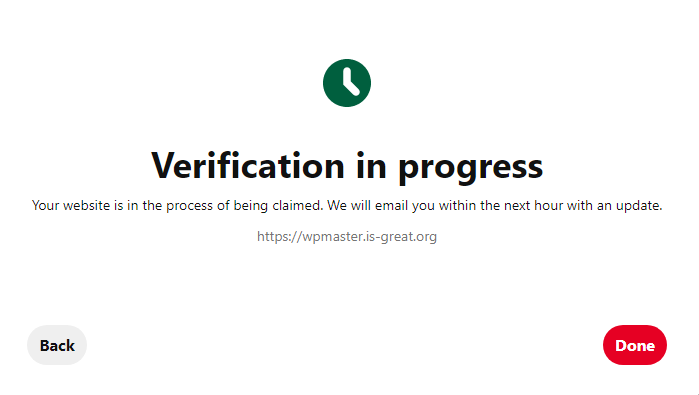
Take your website link and paste it into the claim verify option on Pinterest. This process may take a few seconds.
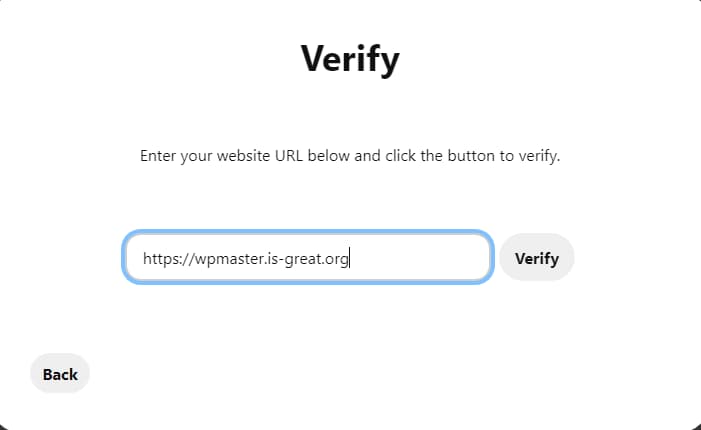
After verification, a verification message will appear. That means your website successfully has been climbed.
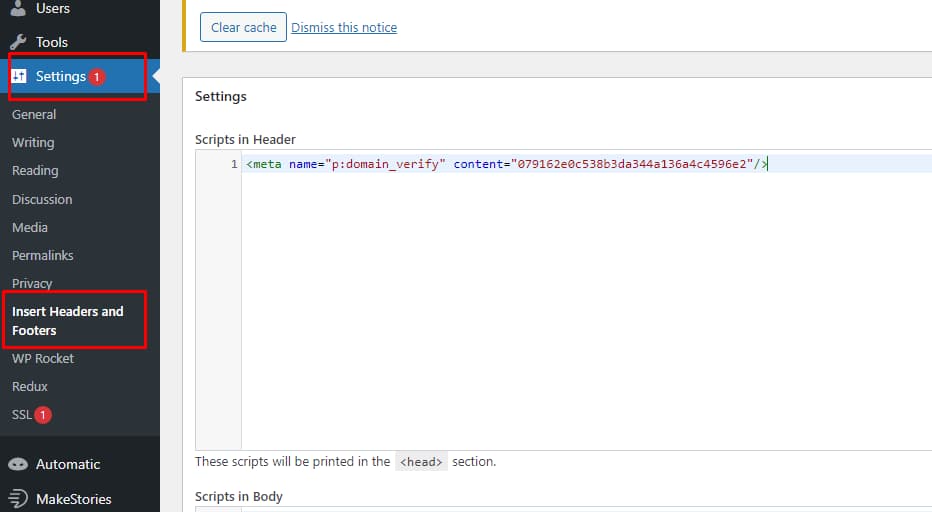
If you don’t want to do it through the theme editor then you can do it another way which is a plugin. For this task, I will recommend you install the “Insert Headers and Footers” plugin. after installation, click on settings >> Insert Headers and Footers option. It will show you three boxes the first one is a “Scripts in Header”, paste the copied link into it, and hit the save button.
Verify Your Website on Pinterest Using Rank Math
We all know that doing on-page SEO manually is very difficult. That’s why we use SEO plugins so that we can do our on-page SEO in a better way. In most cases, the majority of people use SEO plugins. You don’t need to verify manually if you use any SEO plugin. Because every SEO plugin has an option for verification. In this section, I will show you how to do website verification using rank math.
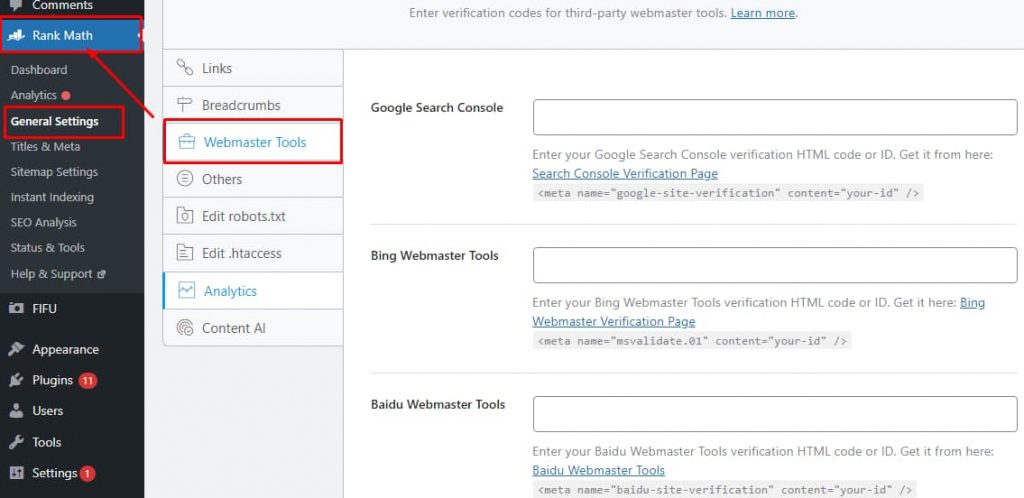
If you already running the “Rank Math SEO” plugin on your website for on-page SEO then you do not need to install it again. Click on the Rank Math >> General Setting >> Webmaster Tools. It will show you an interface, scroll down a little you will see a box which is “Pinterest Verification ID”.
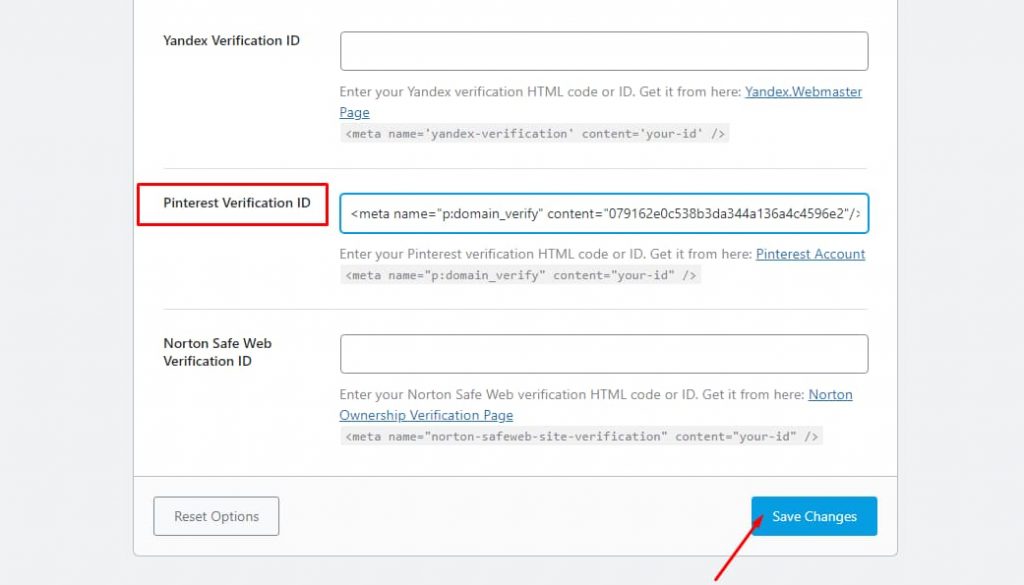
Drop down the copied link into the box and then hit the Save Changes button.
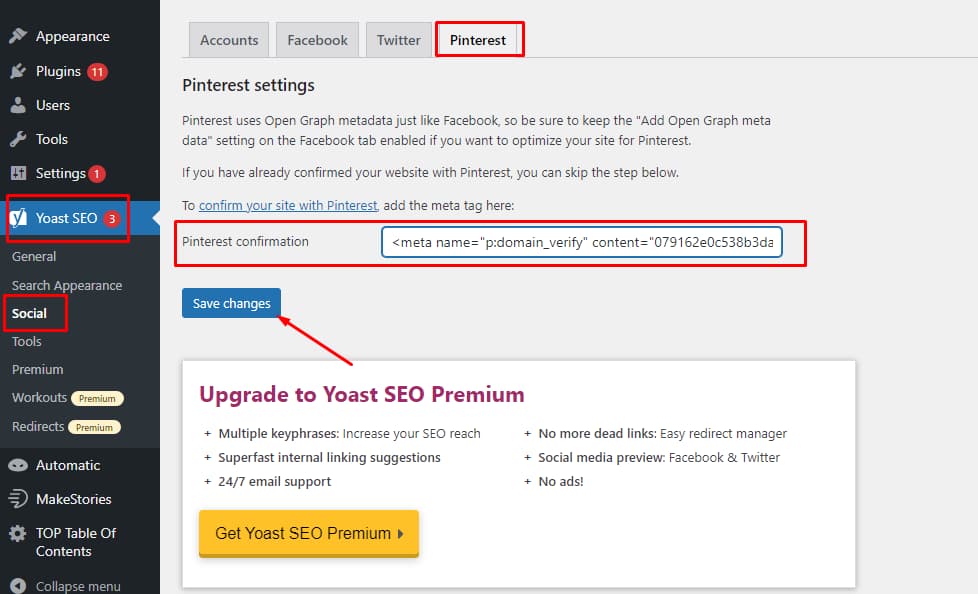
Verify Your Website on Pinterest Using Yoast Seo
Like other SEO plugins “Yoast Seo” Gives an option to verify the website on Pinterest. That’s why we don’t need to verify Through Dashboard. For verification with Yoast Seo first, click on Yoast Seo > > Social > > Pinterest. Now you will see a box below the Pinterest Setting Put the copied link into the box and click on the Save Changes button.
Conclusion
For every blogger, Printerest is needed. Mostly for those who have fashion or photography blogs. In this article, we are trying to cover all things that are needed to know to verify a website on Pinterest. I hope this article will be helpful for you. Feel free to ask them in the comment box if you have any questions about this issue.
You can read the following articles also :
You can read the following articles also :
How to change link color in WordPress (3 Easy methods)
12 Best WordPress Menu Plugins For 2022
How to Create a Separate Page for Blog Posts in WordPress (2022)

Author: Nisha Jahan
Working with WordPress for over three years. Initially started out as a blogger. Strive for professionalism in everything I do, and enjoy writing about my experiences with WordPress.