How to Allow SVG in WordPress
Ready to bring your WordPress website to life with vibrant SVG images? Learn how to allow SVG in WordPress effortlessly. Follow along as we explore simple steps to enable SVG support, making your website design journey smooth and exciting. Let’s dive in and try to find out the creativity of SVGs on your WordPress site today.
Before we dive deep, let’s know what SVG is!
What Is SVG?
SVG, short for Scalable Vector Graphics, is a flexible and dynamic image format that utilizes XML-based code to define shapes, lines, and colors. Unlike traditional image formats like JPEG or PNG, SVGs are resolution-independent, meaning they maintain their quality regardless of size, making them perfect for responsive web design.
Imagine you’re designing a logo for your website. With SVG, you can create a crisp, scalable version of your logo that looks stunning on any device, from a large desktop screen to a tiny mobile phone display.
And now, I think you are wondering how does a SVG file work for WordPress. Well then, let’s learn about it.
How Does SVG Work?
SVG functions by utilizing XML-based markup language to describe two-dimensional vector graphics. Essentially, it’s like providing a set of instructions to a drawing program rather than storing the image as a grid of pixels like traditional image formats.
These instructions include details about shapes, paths, colors, and other graphical elements, allowing SVG images to be scaled, rotated, and manipulated without losing quality.
Think of it as a recipe for creating graphics where you define the ingredients (shapes, lines, colors) and instructions on how to arrange them to form the final image. This dynamic approach to rendering graphics makes SVG versatile and ideal for various applications, from web design to data visualization.
Does WordPress Support SVG?
Yes, WordPress does support SVG (Scalable Vector Graphics) files to some extent. However, there are certain considerations and limitations to be aware of:
- Media Library: WordPress allows you to upload SVG files to the media library like any other image file. You can add SVGs directly through the WordPress dashboard by navigating to Media -> Add New.
- Theme and Plugin Support: While WordPress core supports SVG files, the extent of support may vary depending on your theme and installed plugins. Some themes and plugins may have additional security measures or restrictions in place that affect SVG uploads.
- Security Risks: SVG files can contain executable code, which may pose a security risk if not properly sanitized. To mitigate these risks, WordPress implements security measures such as file type restrictions and validation checks.
- Upload Restrictions: By default, WordPress restricts the upload of certain file types for security reasons. While SVG files are allowed, there may be limitations or restrictions imposed by WordPress or your web hosting provider.
- Browser Compatibility: Modern web browsers generally support SVG files, but older browsers may have limited or no support. Ensure that your target audience uses browsers that fully support SVG for optimal compatibility.
Overall, while WordPress does support SVG files, it’s essential to be mindful of security considerations and any limitations imposed by your theme, plugins, or web hosting provider. By adhering to best practices and staying informed, you can effectively leverage SVGs in your WordPress website design.
Why Is Svg Important For WordPress?
SVG (Scalable Vector Graphics) is super important for WordPress because it helps your website look awesome on any screen. In today’s digital world, where making users happy is key, SVGs are a big deal.
Unlike regular image files, SVGs can be resized without losing quality, which is awesome. This means your website graphics remain crisp and clear on any screen size, from the expansive canvas of a desktop monitor to the compact dimensions of a mobile device.
Moreover, in a world where website speed can make or break user engagement, SVGs shine as lightweight assets that load swiftly, ensuring a seamless browsing experience.
Furthermore, with the growing emphasis on accessibility and SEO optimization, SVGs prove invaluable. They can be easily manipulated with CSS to incorporate alternative text for screen readers, enhancing accessibility and boosting search engine visibility.
In essence, SVG empowers WordPress users to create visually captivating, responsive, and accessible websites that captivate audiences and elevate the online experience.
What Are The Advantages To Use SVG in WordPress?
Looking to enhance your WordPress website with dynamic visuals? SVG offers a host of advantages that can take your site to the next level. Let’s explore some of the key benefits of using SVG in WordPress:
Scalability Without Loss of Quality
One of the standout features of SVG is its ability to scale seamlessly without losing any quality. Whether you’re viewing it on a large desktop screen or a small mobile device, SVG graphics maintain their crispness and clarity.
Faster Loading Times
SVG files are lightweight compared to traditional image formats like JPEG or PNG. This means they load faster, improving your website’s performance and providing users with a smoother browsing experience.
Compatibility Across Devices
Since SVG is based on XML code, it is supported by all modern web browsers. This ensures that your SVG graphics will display consistently across different devices and platforms, regardless of the user’s browser choice.
Animation Capabilities
Unlike static image formats, SVG allows for animation using CSS or JavaScript. This opens up a world of possibilities for creating interactive and engaging visual elements on your WordPress site, from animated logos to dynamic infographics.
Accessibility and SEO Benefits
SVG images can be easily customized with alternative text, making them accessible to users with disabilities and improving your website’s SEO. Additionally, SVGs are indexable by search engines, helping to boost your site’s visibility online.
Incorporating SVG graphics into your WordPress website can elevate its visual appeal, improve performance, and enhance user experience across various devices. With its scalability, faster loading times, compatibility, animation capabilities, and accessibility benefits, SVG proves to be a valuable asset for modern web design.
How to Allow SVG in WordPress
Since using SVG in wordpress has a lot of advantages as we mentioned earlier paragraphs, we need to know how to allow svg in wordpress. Making SVG file is also not that super easy task. For this you need some skills and knowledge.
So, how to upload svg files in wordpress? Well, let’s learn about them. In this case, we can use 2 different and secured methods.
So, what are those methods?
The 2 methods are:
- Allow SVG in WordPress Using a Plugin
- Allow SVG in WordPress Using Manual Process
Now we’ll elaborate one by one. The guideline will be clear to perform the task. So, let’s get started.
1. Allow SVG in WordPress Using a Plugin (Swisstoolkit):

Swisstoolkit is a powerful plugin that helps you integrate the SVG in your site. Besides, this awesome functionality, Swisstoolkit serves more 10 useful functionality for wordpress sites. We’ll talk about later about this plugin.
Let’s now talk about allowing the svg in wordpress using Swisstoolkit plugin.
Here’s a step-by-step guide on allowing SVG in WordPress using the Swisstoolkit plugin:
1. Install Swisstoolkit Plugin:

- Go to your WordPress dashboard.
- Navigate to the “Plugins” section and click on “Add New.”
- Search for “Swisstoolkit” in the search bar.
- Click “Install Now” next to the Swisstoolkit plugin.
- Once installed, activate the plugin.
2. Access Swisstoolkit Settings:
- Look for the “Settings” tab on the WordPress sidebar.
- Find “Swisstoolkit” or “Favicon Uploader” within the settings options.
- Click on it to access the plugin’s settings.
3. Enable SVG Support:
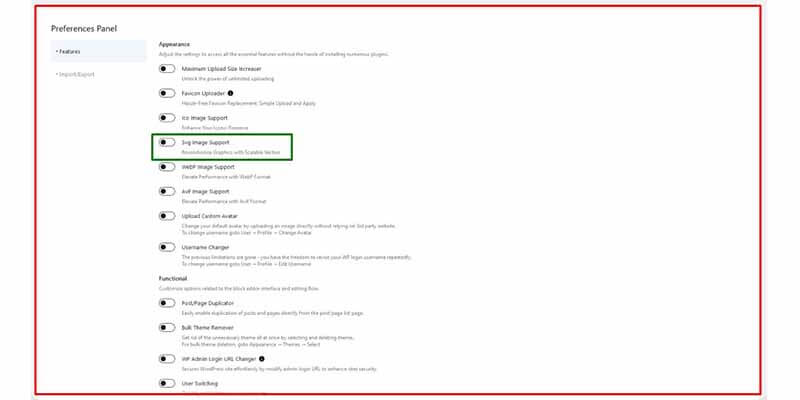
- Within the Swisstoolkit settings, locate the option to enable SVG support.
- This option may be labeled as “Allow SVG Uploads” or similar.
- Toggle the option to enable SVG support on your WordPress site.
4. Configure Additional Settings (Optional):
- Review any additional settings available within the Swisstoolkit plugin.
- Adjust these settings according to your preferences and security requirements.
5. Test SVG Upload:
- Navigate to the Media Library by clicking on “Media” in the WordPress sidebar.
- Click on “Add New” to upload a new media file.
- Select an SVG file from your computer and upload it to your WordPress site.
6. Verify Compatibility:
- After uploading the SVG file, check to ensure it displays correctly on your website.
- Preview the image on different devices and browsers to verify compatibility and responsiveness.
7. Incorporate SVGs into Content:
- Now that SVG support is enabled, you can start incorporating SVG graphics into your WordPress content.
- This includes adding SVG images to posts, pages, or using them in custom elements like headers or footers.
8. Regularly Update the Plugin:
- To ensure ongoing compatibility and security, keep the Swisstoolkit plugin updated.
- Check for updates regularly and install them as needed to maintain optimal performance.
2. Allow SVG in WordPress Using Manual Process
Adding SVG support to WordPress manually involves editing the functions.php file, which requires a good understanding of PHP and SVG security. Before proceeding, it’s crucial to back up your WordPress website to prevent data loss in case of any misconfigurations.
To enable SVG support manually, follow these steps using Hostinger File Manager or an FTP client like FileZilla:
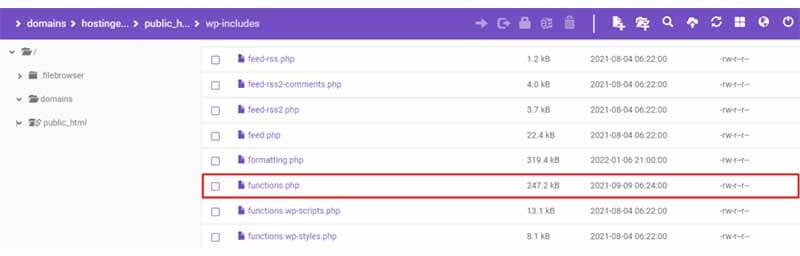
- Access your hosting control panel (hPanel) and navigate to Files -> File Manager.
- Go to public_html -> wp-includes and locate the functions.php file.
- Double-click the functions.php file to open it and paste the following code snippet:
php
Copy code
function add_file_types_to_uploads($file_types)
{
$new_filetypes = array();
$new_filetypes[‘svg’] = ‘image/svg+xml’;
$file_types = array_merge($file_types, $new_filetypes );
return $file_types;
}
add_filter(‘upload_mimes’, ‘add_file_types_to_uploads’);
- Save the changes. You can now try uploading an SVG file type, and if successful, your media library should accept the file upload.
3. Allow SVG in WordPress Using Page Builder
We have already discussed two methods and now the 3rd method is Allow SVG in WordPress Using page builder like Elementor. let’s learn the step by step guide.
1. Access Page Builder Interface:
- Log in to your WordPress dashboard and navigate to the page or post where you want to use the page builder.
- Launch the page builder interface by clicking on the “Edit with [Page Builder Name]” button.
2. Drag and Drop Elements:
- Use the drag-and-drop interface of the page builder to structure your page’s layout as desired.
- Add content elements such as text boxes, images, or buttons to your page layout.
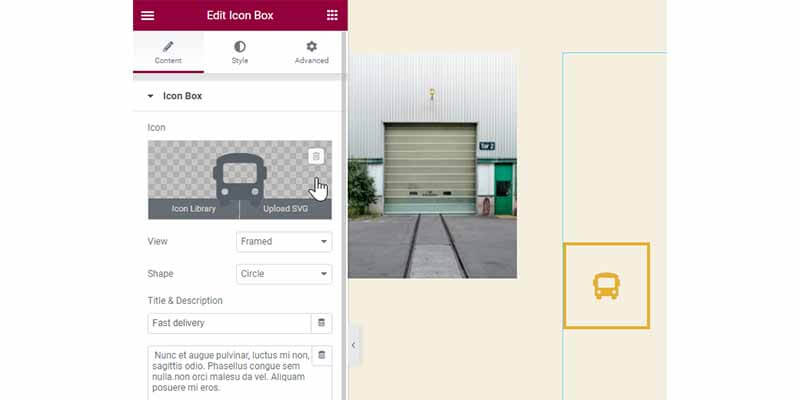
3. Upload SVG Images:
- Look for the option to add icons or images within the page builder’s widget library.
- In some page builders like Elementor, you can directly upload SVG images or choose from their icon library.
4. Enable Unfiltered File Uploads (If Necessary):
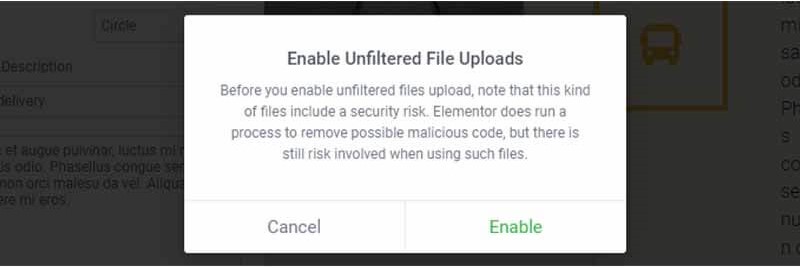
- If you encounter a warning about SVG security when uploading SVGs for the first time, you may need to enable the unfiltered file uploads option.
- This option is typically found in the settings or preferences section of your page builder.
5. Assess Security Risks:
- Note that while some page builders sanitize the code automatically, it’s essential to be cautious about potential security risks.
- Consider the source of the SVG files and weigh the risks before uploading them through the page builder.
6. Finalize and Publish:
- Once you’ve uploaded SVG images and finalized your page layout, preview the changes to ensure everything looks as intended.
- Save or publish your changes to make them live on your WordPress website.
By following these steps, you can easily utilize page builders to upload SVG images and create visually appealing layouts for your WordPress website.
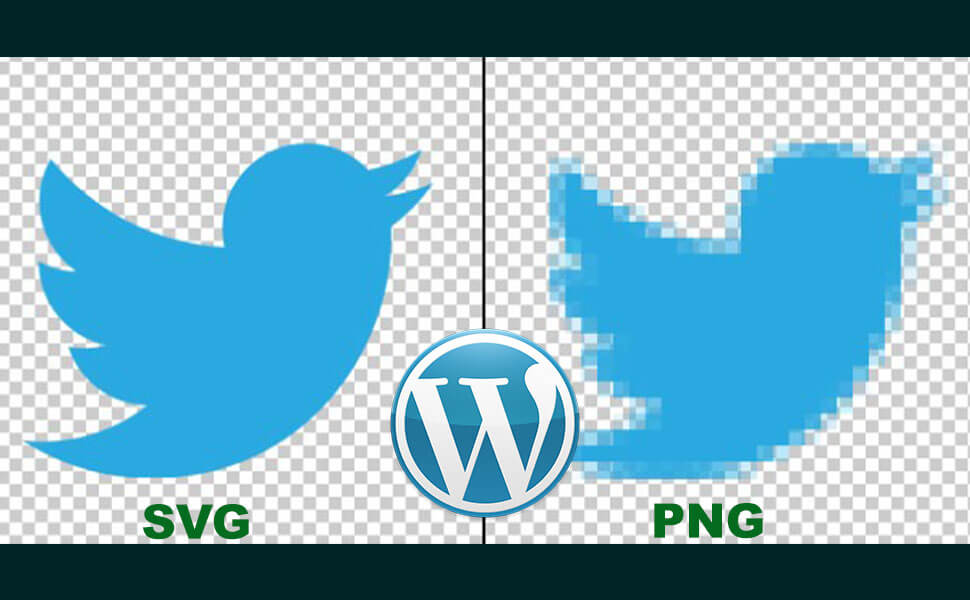
Is SVG Better Than PNG For a Website?
SVG (Scalable Vector Graphics) offers several advantages over PNG (Portable Network Graphics) for website usage:
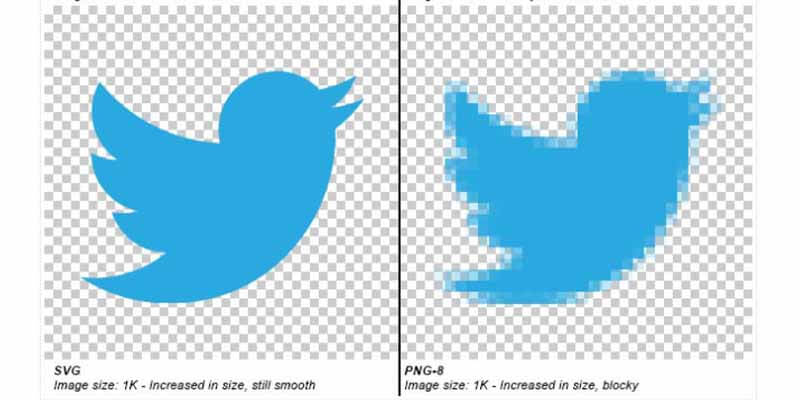
- Scalability: SVGs are resolution-independent, meaning they can be scaled to any size without losing quality. In contrast, PNGs are raster graphics, which means they can become pixelated when scaled up, leading to a loss of quality.
- Smaller File Sizes: SVG files are typically smaller in size compared to PNGs, especially for simple graphics and icons. This results in faster loading times for web pages, contributing to a better user experience and improved website performance.
- Editability: SVGs are created using XML-based code, which makes them easily editable using text editors or graphic design software. This flexibility allows for quick modifications and customization without compromising quality. On the other hand, PNGs are static images that require image editing software for modifications.
- Accessibility and SEO: SVGs can be styled and manipulated using CSS (Cascading Style Sheets), making them accessible to screen readers and search engine crawlers. This improves accessibility for users with disabilities and enhances SEO (Search Engine Optimization) by providing indexable content.
- Scalable Animations: SVGs support animations and interactivity using CSS or JavaScript, allowing for dynamic and engaging visual effects without the need for additional plugins or scripts. PNGs, being static images, cannot achieve the same level of interactivity.
Overall, SVGs offer superior scalability, smaller file sizes, editability, accessibility, and support for animations compared to PNGs, making them a better choice for many web design scenarios.
Should I Use an SVG logo on My WordPress Website?
Using an SVG logo on your WordPress website can offer several advantages:
- Scalability: An SVG logo can scale seamlessly to any size without losing quality, ensuring it looks crisp and clear on all devices and screen resolutions.
- Faster Loading Times: SVG files are typically smaller in size compared to raster image formats like JPEG or PNG. This results in faster loading times for your website, contributing to a better user experience and improved performance.
- Editability: SVG logos are easily editable using vector graphics software or text editors, allowing you to make changes or adjustments without losing quality.
- Accessibility: SVG logos can be styled and manipulated using CSS, making them accessible to screen readers and improving accessibility for users with disabilities.
- SEO Benefits: SVG logos are indexable by search engines, contributing to better SEO (Search Engine Optimization) for your website.
However, it’s essential to consider a few factors before using an SVG logo:
- Browser Compatibility: While modern web browsers support SVG, some older browsers may have limited or no support. Ensure your target audience uses browsers that fully support SVG.
- Complexity of Logo: SVGs are best suited for simple or moderately complex logos. Highly detailed or intricate logos may not translate well into SVG format and could result in larger file sizes.
- Brand Consistency: Make sure the SVG version of your logo maintains consistency with its raster counterpart in terms of colors, fonts, and overall design.
Overall, using an SVG logo on your WordPress website can offer numerous benefits, especially in terms of scalability, loading times, editability, accessibility, and SEO. Consider these factors and assess whether an SVG logo aligns with your website’s design and goals.
Why Can’t I Upload My SVG files to WordPress?
There are several reasons why you may encounter difficulties uploading SVG files to WordPress:
- Security Restrictions: By default, WordPress restricts the upload of certain file types, including SVGs, due to potential security risks. SVG files can contain executable code, which could pose a security threat if not properly sanitized.
- File Type Restrictions: Your web hosting provider may have additional restrictions in place that prevent the upload of SVG files for security reasons. They may block certain file types or impose file size limits.
- WordPress Version: Older versions of WordPress may not fully support SVG files or may have stricter security restrictions in place. Updating to the latest version of WordPress may resolve this issue.
- Theme or Plugin Conflict: Sometimes, conflicts with your WordPress theme or plugins can prevent the upload of SVG files. Certain themes or plugins may have their own security measures that restrict SVG uploads.
- Insufficient Permissions: If your WordPress user role does not have the necessary permissions to upload files, including SVGs, you may encounter issues. Ensure that your user role has the appropriate permissions granted by the site administrator.
- File Size Limitations: Even if SVG uploads are allowed, there may be file size limitations imposed by either WordPress or your web hosting provider. Check the maximum file size allowed for uploads and ensure your SVG file does not exceed this limit.
- Corrupted File: In some cases, the SVG file itself may be corrupted or improperly formatted, which could prevent it from being uploaded. Try re-saving the file or using a different SVG editor to ensure it is valid.
By addressing these potential reasons, you can troubleshoot and resolve issues related to uploading SVG files to WordPress effectively. If the problem persists, consider reaching out to your web hosting provider or seeking assistance from WordPress support forums for further guidance.
Frequently Asked Questions:
Q1: How do I enable SVG support in WordPress?
A1: You can enable SVG support in WordPress by using a plugin or manually editing the functions.php file.
Q2: What is the recommended plugin for enabling SVG support in WordPress?
A2: The SVG Support plugin is commonly recommended for enabling SVG support in WordPress due to its simplicity and effectiveness.
Q3: Can I manually allow SVG uploads in WordPress without using a plugin?
A3: Yes, you can manually allow SVG uploads in WordPress by editing the functions.php file, but it requires some technical knowledge.
Q4: Are there any security risks associated with allowing SVG uploads in WordPress?
A4: Yes, SVG files can contain executable code, so it’s essential to ensure proper security measures are in place to mitigate any risks.
Q5: How can I ensure the security of SVG uploads in WordPress?
A5: You can ensure the security of SVG uploads in WordPress by using plugins that sanitize SVG files or by implementing strict file upload restrictions.
Q6: Are there any compatibility issues with using SVG files in WordPress?
A6: While modern web browsers generally support SVG files, older browsers may have limited or no support, so it’s important to consider compatibility when using SVG files in WordPress.
Q7: What are the benefits of using SVG files in WordPress?
A7: Using SVG files in WordPress offers benefits such as scalability, smaller file sizes, editability, accessibility, and SEO advantages compared to raster image formats like JPEG or PNG.
Wrapping Up:
In conclusion, enabling SVG support in WordPress offers a range of benefits for website design and functionality. Whether through plugins or manual methods, understanding How To Allow SVG In WordPress empowers users to enhance their websites with scalable vector graphics, contributing to improved visual appeal, faster loading times, and enhanced user experience.
Read More Articles:

Author: Taj
Hello there! I'm Taj Uddin Ahmed, a seasoned professional with over 4 years of expertise in Content Writing, Search Engine Optimization (SEO), WordPress Site Design, and Affiliate Marketing. I specialize in making complex digital stuff simple, ensuring online journey is not just smooth but also successful. When away from Computer, I like playing Chess, watching Movies, and Adventurous Tours.