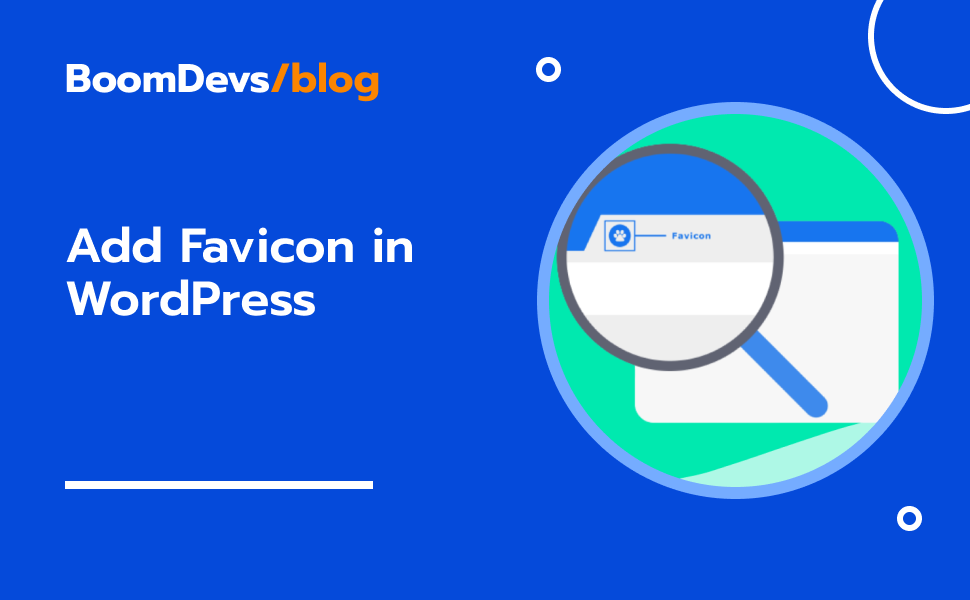
How To Add Favicon In WordPress?
Welcome to our comprehensive tutorial on changing the favicon in WordPress! Your website’s favicon, that small but significant icon displayed in browser tabs and bookmarks, plays a crucial role in your site’s branding. By customizing it, you can add a personal touch and make your site stand out from the crowd. In this guide, we’ll walk you through the step-by-step process of how to add favicon in WordPress, ensuring that your site reflects your brand identity and enhances user experience seamlessly.
In this guide, we’ll walk you through the step-by-step process of updating your favicon using various methods. Whether you prefer to utilize the theme customizer, a plugin, or manual code insertion, we’ve got you covered. Follow along as we show you how to effortlessly customize your site’s favicon and give it a unique identity that reflects your brand.
What is Favicon?
A favicon, short for “favorite icon,” is a small but significant graphical element typically displayed in a web browser’s address bar or next to the site’s name in bookmarks. They help people recognize websites easily and can even be used as shortcuts on phones. Basically, a favicon is a small picture that represents a website, like a simplified version of its logo. Adding a favicon to your website makes it look more professional and helps people find it in search engines. So, if you want your website to look good and be easy to find, adding a favicon is a smart move.
Additionally, from an SEO perspective, having a favicon can enhance brand visibility in search results, as search engines often display them alongside website listings. Thus, implementing a favicon is a crucial aspect of website design, offering both visual appeal and search engine optimization benefits
Why Should You Add a Favicon to Your WordPress Site
Adding a favicon to your WordPress site is a simple yet impactful step that can significantly enhance your website’s appearance, branding, user experience, and even its SEO performance.
Firstly, let’s understand what a favicon is. A favicon, short for “favorite icon,” is a small graphical element displayed in a web browser’s address bar, tabs, or next to the site’s name in bookmarks. It serves as a visual representation of your website, typically displaying your logo or a simplified version of it.
So, why should you add a favicon to your WordPress site? Here are several reasons:
Branding: A favicon is an essential part of your branding strategy. It helps users identify and remember your website more easily. By incorporating your logo or brand icon into the favicon, you reinforce brand recognition every time someone visits your site.
Professionalism: Having a favicon adds a layer of professionalism to your website. It shows attention to detail and gives the impression that you care about your site’s appearance and user experience.
User Experience: Favicons improve user experience by making it easier for visitors to navigate your site. When users have multiple tabs open, a favicon helps them quickly locate your site among others. It also adds visual interest and makes your site stand out in bookmarks, enhancing overall usability.
Visual Appeal: Integrating a favicon into your WordPress site contributes to its overall aesthetics. A well-designed favicon adds a touch of visual interest and cohesion to your site’s design, making it more visually appealing to visitors.
SEO Benefits: While the direct impact of a favicon on SEO is minimal, it can indirectly benefit your site’s search engine performance. Search engines like Google often display favicons alongside website listings in search results. Having a recognizable favicon can increase brand visibility and click-through rates, potentially improving your site’s SEO performance over time.
Adding a favicon to your WordPress site is relatively straightforward. Many WordPress themes include built-in options for adding a favicon through the theme customizer. Alternatively, you can use a WordPress plugin specifically designed for managing favicons.
In conclusion, adding a favicon to your WordPress site is a small yet essential aspect of website design that can have a significant impact on branding, user experience, and even SEO. It’s a simple step that demonstrates attention to detail and professionalism while contributing to a cohesive and visually appealing website.
Why do you need to change your favicon?
Changing your favicon is important to keep your website looking fresh and up-to-date. As your brand evolves, updating your favicon ensures it reflects your current style and message. It’s like giving your website a new coat of paint to keep it modern and interesting for visitors. Plus, when search engines show your site in results, a recognizable favicon can make your brand stand out. So, by regularly changing your favicon, you not only keep your site looking good but also help people find and remember it more easily.
How to create a Favicon
Creating a favicon for your website is easier than you might think! First, design a simple square image, usually about the size of a postage stamp. You can use free online tools like Canva or graphic design software like Photoshop. Keep it simple, as it’ll appear small in browser tabs and bookmarks. Save your design in a format like .ico, .png, .jpg, or .gif. Then, upload it to your website using your site’s dashboard or a special plugin if you’re using WordPress. Test it out to make sure it looks good in different browsers and devices. Here’s a quick breakdown of some recommended sizes for favicons:
- 16px: This is a general-use size for all browsers, and represents the minimum dimension.
- 32px: Several tools use this size, such as a new tab page in Internet Explorer, a taskbar button in Windows, and Safari’s Read Later sidebar.
- 57px: This represents the dimensions for a standard (i.e. non-Retina) iOS home screen.
- 72px: This size matches a standard iPad home screen icon.
- 114px: More modern Apple devices will want to use this size, as Retina displays take advantage of double-standard dimensions for crisp viewing.
That’s it! Now you have a professional-looking favicon that makes your website stand out.
How to Add a Favicon to WordPress
If you’re wondering how to add a favicon to your WordPress site, don’t worry, there are a few easy options to choose from:
- Using plugin
- WordPress Customizer
- Theme Options Page
Just search for These methods are simple, so let’s dive into each one to see how to add your favicon step by step.
Add a Favicon to WordPress by Using Plugin
If you want to Add a Favicon on your WordPress site, using a plugin is a really easy way to do it. One of the best plugins for this job is called Swiss Toolkit What’s Swiss Toolkit? It’s a tool that helps you do lots of things on your website, and we’ll talk more about it in a bit.
But first, let’s focus on how you can use a plugin to add favicon in your WordPress site. You’ll need to know how to locate, install, activate, and then use the plugin to add favicon to your website.. Follow this step-by-step guide to make the process smooth.
Step 1: Installing and Turning On the Plugin
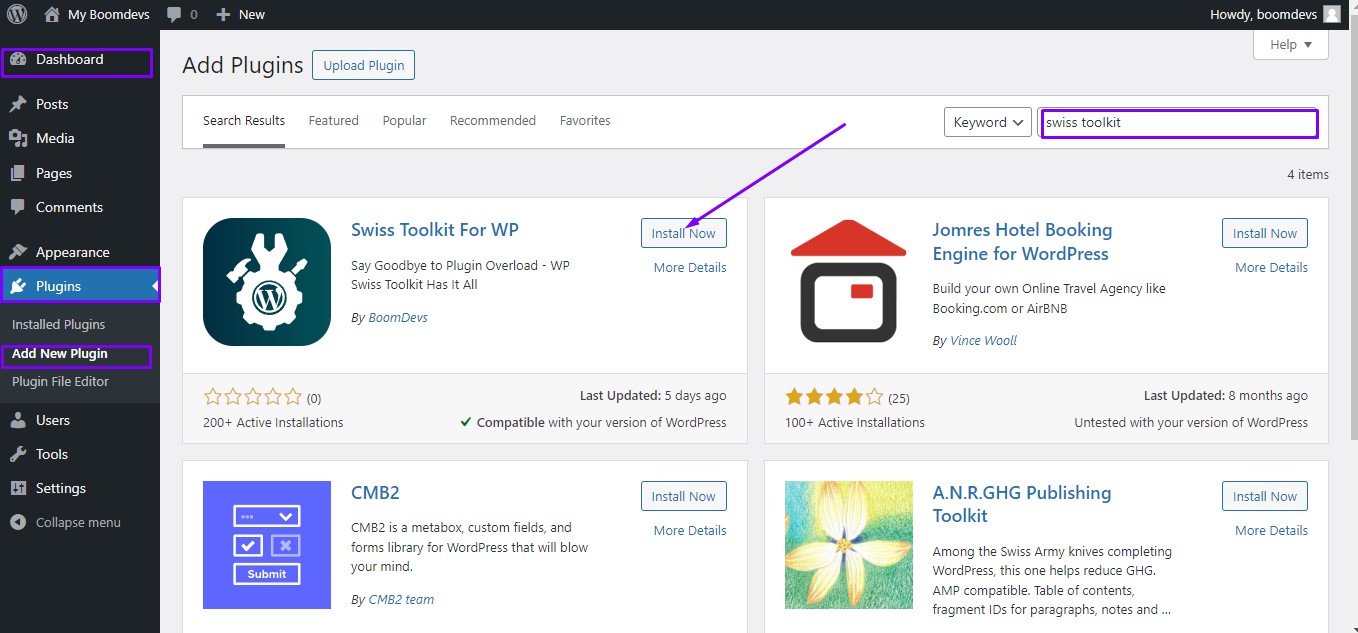
- First, go to your WordPress dashboard, then click on “Plugins” and choose “Add New.”
- Type “Swiss Toolkit” into the search box and press enter.
- Look for Swiss Toolkit in the search results and click “Install Now.”
- Once it’s installed, click on “Activate” to start using the plugin.
Step 2: Enabling Favicon Uploader Option
- After activating the Swiss Toolkit plugin, return to your WordPress dashboard.
- Look for “Swiss Toolkit” in the menu on the left side and click on it. Then click on features,
- Go to the plugin’s settings find the favicon uploader option and turn it on. It shows you upload options. Click the upload button, then it will take you directly to the media library here.
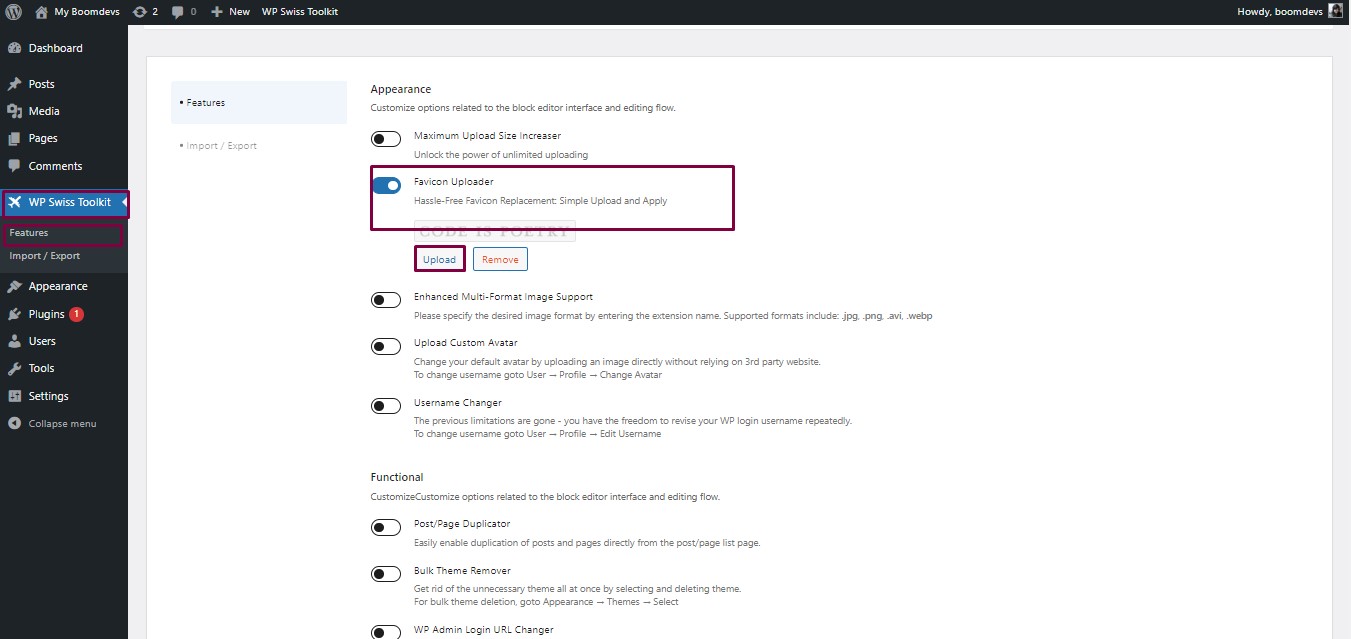
- Upload the file you want to use as a favicon. When the upload is complete, click on the select button. Now click on the save button.
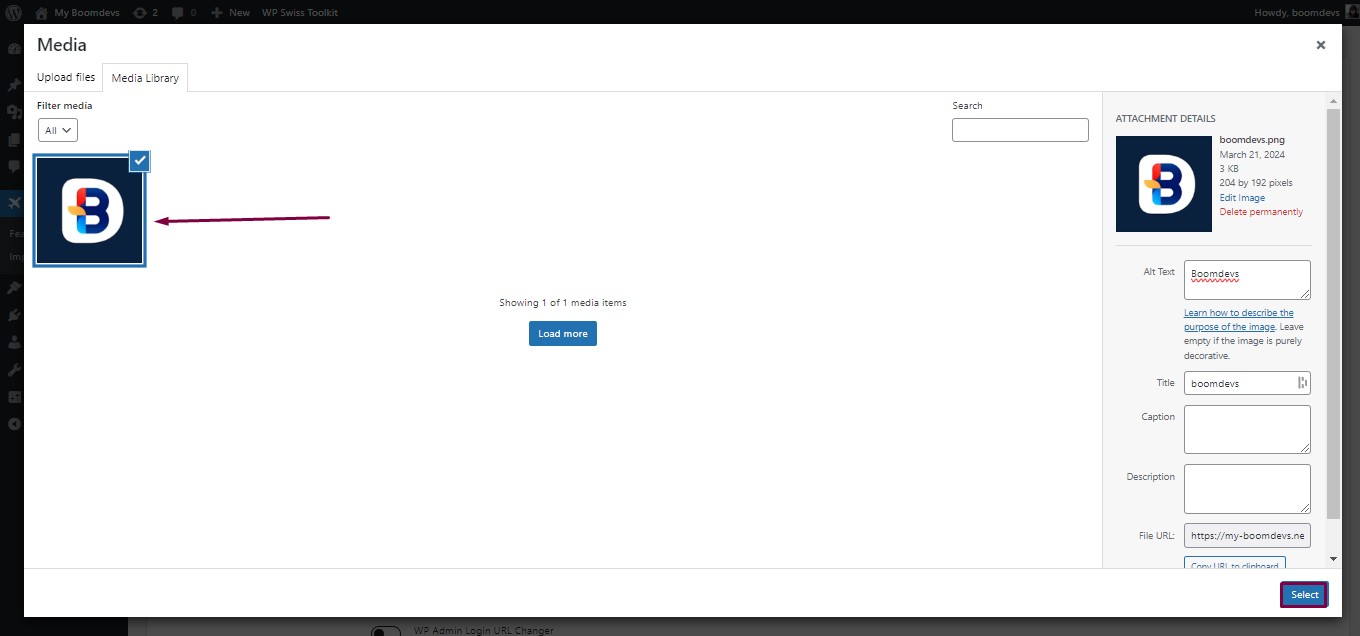
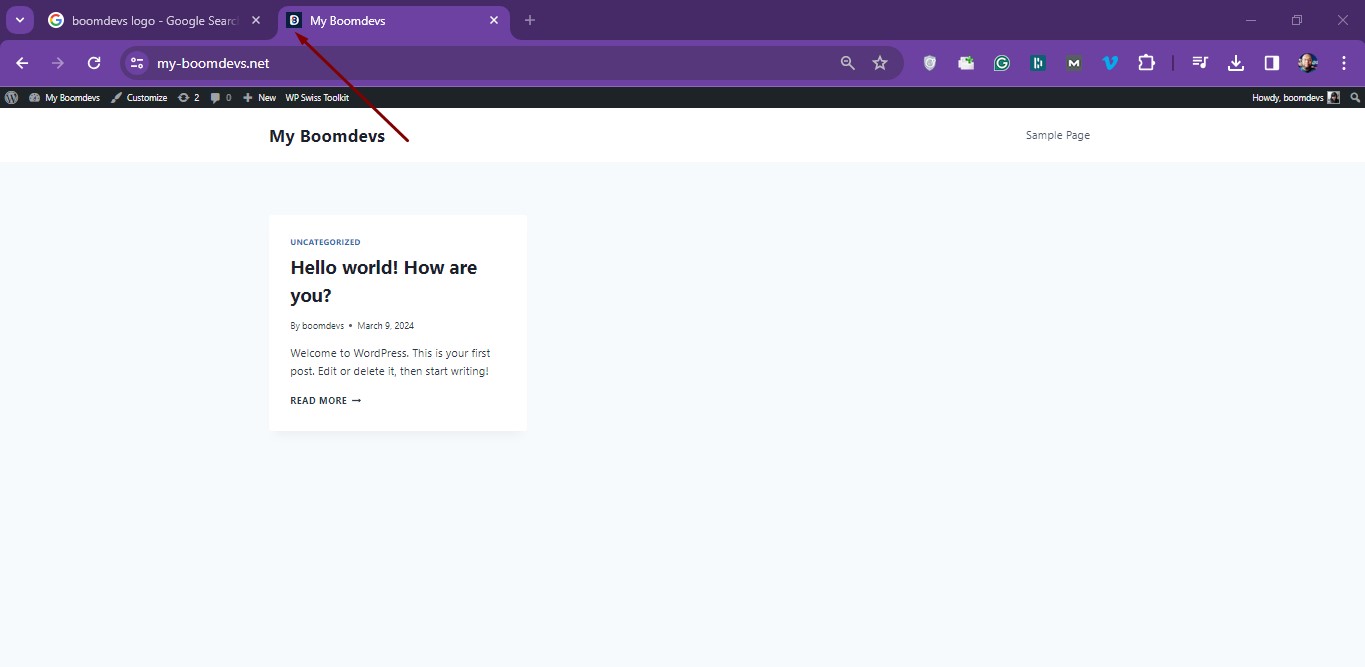
- Let’s check if it is working or not. Go to your website. See it working properly. This way, you can easily add favicon to your WordPress site without any hassle.
Why I Chose Swiss Toolkit For Add Favicon In WordPress
I chose the Swiss Toolkit as the optimal choice for adding a favicon in WordPress because it offers an all-in-one solution as a WordPress Plugin. It goes beyond just uploading pictures, providing numerous benefits for website management. One of its key features is the ability to easily upload and change images, which is crucial for our tutorial.
Developed by BoomDevs, the Swiss Toolkit is a multi-purpose plugin with a range of features. These include Insert Header & Footer, allowing effortless addition of text or code to the top or bottom of your website, and Post/Page Duplicator for quick duplication of any page or post. Additionally, it offers features like Change Login URL for enhanced security, Maximum Upload Size to share larger files seamlessly, and Quick Settings Search to find all WordPress settings efficiently.
By consolidating multiple functionalities into one plugin, the Swiss Toolkit reduces plugin overload in WordPress and simplifies site management, freeing up time to focus on content creation and sharing. With these features, the Swiss Toolkit simplifies the management of your WordPress site, allowing you to focus on creating and sharing content without getting bogged down by technical tasks.
Using the WordPress Customizer
If your WordPress theme supports favicons, you can easily add one from your WordPress dashboard. Here’s a step-by-step guide:
Navigate to Appearance: Log in to your WordPress dashboard and click on “Appearance” in the left-hand sidebar. This will open up a submenu of customization options.
Access the Customizer: Within the “Appearance” menu, locate and click on “Customize.” This will launch the WordPress Customizer, a tool that allows you to make various visual and functional changes to your website.
Go to Site Identity: Once in the Customizer, look for the section labeled “Site Identity.” This section usually contains options related to your site’s branding, such as its title, tagline, and logo.
Select Site Icon: Within the “Site Identity” section, you should find an option labeled “Site Icon” or “Favicon.” Click on this option to access the settings related to your favicon.
Review Size Recommendations: In the “Site Icon” settings, you’ll typically see recommendations for the size of your favicon. It’s essential to create your favicon image in advance and ensure it meets these size requirements for optimal display across different devices and browsers.
Upload Your Favicon: Once you have your favicon image ready, click on the button labeled “Select site icon” or “Upload” to choose your file from your computer’s storage. After selecting your favicon image, it will be uploaded to your WordPress site’s Media Library.
Preview and Save Changes: After uploading your favicon, you’ll see a preview of how it will appear in browser tabs and as a mobile app icon. Take a moment to review the preview and ensure everything looks as expected. If you’re satisfied with the preview, click on the “Save & Publish” button to apply your changes and make your new favicon live on your website.
Changing Your Favicon Later: If you ever want to change your favicon in the future, simply revisit the “Site Icon” settings within the WordPress Customizer and follow the same steps to upload a new image. You can update your favicon as often as needed to reflect changes in your branding or design preferences.
By following these detailed instructions, you can add a favicon to your WordPress site with ease and ensure a consistent and professional appearance across all devices and browsers.
Theme Options Page
Adding a favicon to your WordPress site can be done in various ways depending on the theme you’re using. With updated versions of WordPress, managing themes is typically done through the Customizer, which offers a user-friendly interface for customizing various aspects of your site’s appearance, including the favicon.
However, some themes, especially premium ones, may have their own options pages separate from the Customizer. These options pages often provide additional customization features, including settings for the favicon. Despite having separate options pages, many premium themes still integrate with the Customizer, directing users to it for managing certain aspects of the theme.
For example, the default WordPress theme Twenty Nineteen handles favicons exclusively within the Customizer. Users can navigate to “Appearance” > “Customize” in their WordPress dashboard, then locate the “Site Identity” or “Site Icon” section to upload their favicon image. This section typically provides size recommendations for the favicon image and allows users to preview how it will appear in browser tabs or as a mobile app icon.
On the other hand, premium themes like Avada may offer a different approach. They might create a new menu item in the WordPress dashboard specifically for theme options, including favicon settings. Within the theme options page, users can directly upload their favicon image and may also have the option to specify separate images for specific devices like iPhones and iPads.
It’s important to note that each theme is unique, so the process of adding a favicon may vary. If you’re unsure how to add a favicon to your WordPress site or if your theme has specific requirements or recommendations, it’s always a good idea to refer to the theme documentation or reach out to the theme developer for assistance. Overall, adding a favicon to your WordPress site is a relatively straightforward process, whether you’re using the Customizer or theme options page, and it doesn’t require any advanced technical skills.
FAQ
Q1: What is a favicon?
A: A favicon is a small icon or image that appears in your web browser’s tab next to the title of a website. It helps users identify and remember a website visually.
Q2: Why should I change my favicon in WordPress?
A: Changing your favicon allows you to update your website’s branding, keep it fresh, and maintain consistency with your overall design theme.
Q3: How do I change my favicon in WordPress?
A: There are several methods to change your favicon in WordPress. One way is to access the theme customizer from your WordPress dashboard. Look for the ‘Site Identity’ section, where you can upload a new favicon image. Alternatively, you can use a WordPress plugin designed for managing favicons.
Q4: What size should my favicon be?
A: Favicons are typically square and sized at either 16×16 pixels or 32×32 pixels. However, some modern browsers support larger favicon sizes for higher resolution displays.
Q5: What file format should my favicon be in?
A: Favicons are commonly saved as .ico files, but WordPress also accepts other image formats such as .png, .jpg, or .gif. Ensure your favicon is saved in the appropriate format before uploading it to your WordPress site.
Q6: Will changing my favicon affect my SEO?
A: Changing your favicon itself will not directly impact your SEO. However, maintaining a consistent and visually appealing favicon can contribute to positive user experience and brand recognition, which can indirectly benefit your site’s SEO.
Q7: How often should I change my favicon?
A: There’s no set rule for how often you should change your favicon. It’s a good idea to update it whenever your branding or design theme changes to ensure consistency across your website.
Q8: Can I preview my favicon before making it live?
A: Yes, most WordPress themes allow you to preview changes made to your favicon in the theme customizer before saving and publishing them live on your website.
Q9: Do I need coding knowledge to change my favicon in WordPress?
A: No, changing your favicon in WordPress is typically a straightforward process that doesn’t require coding knowledge. You can usually do it through the theme customizer or with the help of a plugin, both of which offer user-friendly interfaces for uploading and managing favicons.
Conclusion
In summary, changing the favicon in WordPress is simple and important for making your website look better and be more recognizable. Just follow the steps we talked about, like designing a small square image and uploading it to your site. By doing this, you’ll make your website stand out in browser tabs and bookmarks, which helps people remember and trust your brand. WordPress makes it easy to update your favicon whenever you need to, so don’t hesitate to make changes to keep your site looking fresh and professional.

Author: Rafy
Hi! I'm I am Rafy Naz, an SEO professional and Digital Marketer with over 8 years of market experience. On-Page SEO, Technical SEO, Off-Page SEO, and Content Writing are my main expertise. I am also an expert in Video marketing & YouTube. I am very simple but ambitious. I always think to live my life with honesty.