


- 1. Key Takeaways
- 2. Why Learn Android Development?
- 3. What Do You Actually Need to Start Android Development in 2026?
- 4. How to Set Up Your Android Development Environment, Step by Step
- 5. Android Studio Tools Worth Knowing About Early
- 6. What Are the Four Main Components of an Android App?
- 7. Jetpack Compose vs. XML: Which Should You Learn First?
- 8. How Is AI Already Changing Android Development in 2026?
- 9. Why (and When) Should You Add Firebase to Your App?
- 10. What API Level Should Your First App Target?
- 11. How to Publish Your App to Google Play
- 12. Is There an Official Android Development Certificate?
- 13. Common Mistakes Beginners Make (and How to Skip Them)
- 14. What Should You Build First? Project Ideas That Actually Teach You Something
- 15. Your Android Learning Roadmap
- 16. What to Learn Next (Once the Basics Click)
- 17. Not Ready to Build It Yourself? Here's the Other Path
- 18. Frequently Asked Questions
- Is there a free beginner’s guide to Android development?
- Which language is best for beginners in 2026, Kotlin or Java?
- Can I get a certificate for Android development?
- What are the four main components of an Android app?
- How much RAM do I actually need for Android Studio in 2026?
- What minSdkVersion should a beginner project use?
- How much does it cost to publish an app on Google Play, and how long does it take?
Summarize with
Key Takeaways
- Kotlin is Google’s default language for new Android projects. You do not need to learn Java first.
- Android Studio needs 8 GB of RAM to run on its own, or 16 GB with the emulator, according to Google’s official install requirements.
- Jetpack Compose has replaced XML as the recommended way to build UI, though XML still shows up in older, existing codebases.
- Gemini in Android Studio now handles code completion, error explanations, test generation, and agent-driven app building, right inside the editor.
- Firebase steers new projects toward Cloud Firestore instead of the classic Realtime Database, a shift most beginner guides still miss.
- Picking a minimum supported Android version (minSdkVersion) is a separate decision from meeting Google Play’s target API requirement new apps must target Android 16 (API 36) by August 31, 2026, regardless of how far back your minSdkVersion reaches.
Building your first Android app in 2026 means writing Kotlin in Android Studio, laying out screens with Jetpack Compose instead of old XML files, and usually wiring the result to Firebase for logins and data storage. That combination, Kotlin plus Compose plus Firebase, has quietly replaced the Java-and-XML stack that dominated tutorials for most of the last decade. This beginner’s guide to Android development walks through setup, the core building blocks every app shares, and the AI tooling now built into the IDE, so you can go from an empty folder to a running app on your own phone. And if you’re weighing whether to learn this yourself or bring in Boomdevs’ mobile app development team instead, this guide should make that decision easier either way.
Why Learn Android Development?
A few practical reasons this is a reasonable skill to invest in right now, beyond “Android is popular”:
- Reach. Android runs on roughly seven out of every ten smartphones worldwide, according to StatCounter no other single platform puts an app in front of that many people.
- No hardware gatekeeping. Unlike iOS development, which requires a Mac, Android development runs fine on Windows, Linux, or macOS. You don’t need to buy new hardware to start.
- Genuinely free tooling. Android Studio, Kotlin, Jetpack Compose, and Firebase’s free tier cost nothing to learn or build with. The only unavoidable cost is the one-time $25 Google Play developer fee, and only once you’re ready to publish.
- A real, marketable skill. Mobile development roles consistently show up in demand across job boards, and a working app in a portfolio demonstrates ability in a way a certificate alone doesn’t.
- AI tooling lowers the entry barrier further. Gemini in Android Studio (covered below) means a beginner today gets inline explanations and code generation that simply didn’t exist for the last generation of Android developers learning from static tutorials.
None of this means it’s effortless, but the barrier to trying is close to zero: a free IDE, a free language, and a phone you probably already own to test on. If you’re building for a business rather than for practice, a mobile app consultant can help you decide what to build yourself and what to hand off.
What Do You Actually Need to Start Android Development in 2026?
You need a reasonably modern computer, the free Android Studio download, and a willingness to learn Kotlin. That’s genuinely most of it. No paid license, no Mac required, no prior coding background assumed.
Hardware. Google’s official system requirements list 8 GB of RAM as the minimum to run Android Studio by itself, and 16 GB once you add the emulator into the mix. Google recommends 32 GB for serious, day-to-day work, especially once you start running more than one virtual device at a time (each one eats roughly 4 GB of memory on its own). Windows and Linux machines also need virtualization support (Intel VT-x or AMD-V) enabled in the BIOS, or the emulator will crawl.
Software. Download the latest stable release of Android Studio. Google names each release after an animal in alphabetical order, and the version naming scheme updates every few months, so don’t worry about memorizing a specific codename. Just grab whatever the download page currently calls stable.
Knowledge. Kotlin is Google’s preferred language for Android now, thanks to its safer null-handling and shorter syntax compared with Java. If you already know Java, that background still helps you read older code, but it’s optional for anything you build from scratch today.
Here’s a bit of context on why this is worth learning at all: Android runs on roughly seven out of every ten smartphones worldwide, according to StatCounter. That scale is exactly why so many “getting started” guides exist, and also why so many of them are outdated the moment Google ships its next feature drop.
How to Set Up Your Android Development Environment, Step by Step
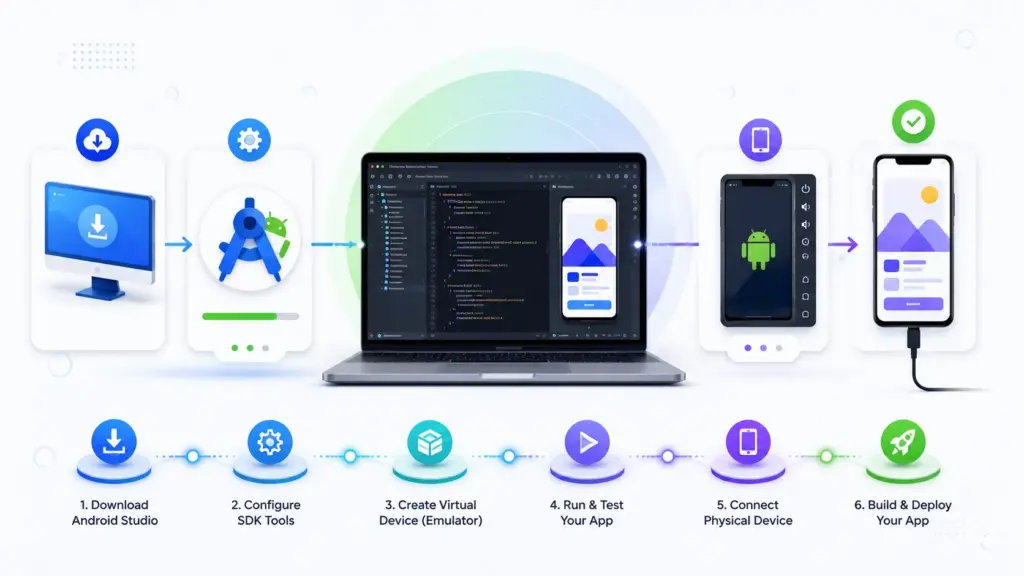
- Download Android Studio. Visit the official developer portal and grab the installer for your OS.
- Configure the SDK. Open the SDK Manager inside Android Studio and install the API level you’re targeting, plus at least one older API for compatibility testing.
- Create a virtual device. Use the Device Manager to spin up an emulator (a Pixel profile is a safe default) so you can test without owning a physical phone.
- Optional: connect a real device. Turn on Developer Options on an Android phone, flip on USB Debugging, and you can deploy straight to hardware instead of the emulator.
A quick, honest note: the emulator’s first boot is slow, sometimes painfully so. That’s normal, not a sign something broke. Every boot after the first is much faster.
Android Studio Tools Worth Knowing About Early
Android Studio bundles a lot more than a code editor. You won’t use most of these in week one, but knowing they exist saves you from reinventing them badly later.
| Tool | What It’s For | When You’ll Reach for It |
| Layout Inspector | See your UI’s actual view hierarchy at runtime | When something’s positioned or sized wrong and you can’t tell why from the code |
| Logcat | Real-time stream of system and app logs | Debugging crashes, tracing what your app is actually doing step by step |
| Profiler | Tracks CPU, memory, and network usage live | Once your app feels slow or you suspect a memory leak |
| Device Manager | Create and manage emulator profiles | Setting up virtual devices, covered in the setup steps above |
| Gemini | AI code completion, error explanations, test generation, Agent Mode | From day one, for unblocking yourself and speeding up boilerplate |
| Git/VCS integration | Built-in version control without leaving the IDE | As soon as you start a project, per the GitHub note above |
| APK Analyzer | Inspect the contents and size of a built app | Right before you’re preparing to publish, to catch bloated builds |
You don’t need to memorize this table. Just recognize the names when Android Studio mentions them, so you know where to look instead of searching blindly.
What Are the Four Main Components of an Android App?
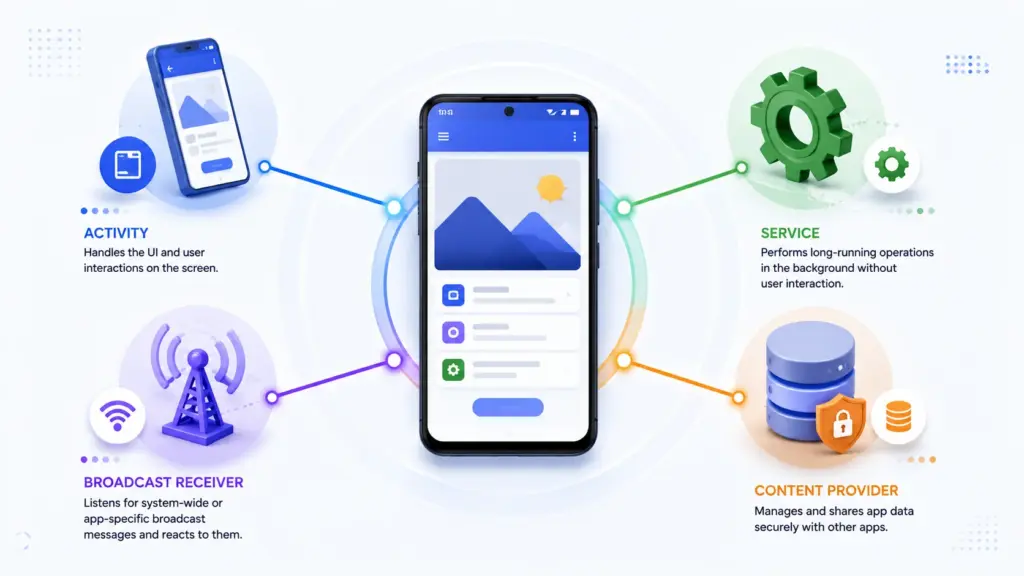
Every Android app is built from the same four building blocks, sometimes called the “four pillars” of Android, no matter how simple or complex the app gets.
- Activities. The individual screens a user actually sees and taps through.
- Services. Background processes that keep running without a visible screen, like a music player that keeps playing while you check email.
- Broadcast Receivers. Listeners that react to system-wide events, such as a low-battery warning or a change in network connectivity.
- Content Providers. The mechanism apps use to share structured data with each other, such as how a third-party app might read your contacts (with permission).
Learning to recognize these four pieces early saves a lot of confusion later. Most beginner confusion about “why won’t my app do X” traces back to a misunderstanding of which of these four components should own that behavior.
Jetpack Compose vs. XML: Which Should You Learn First?
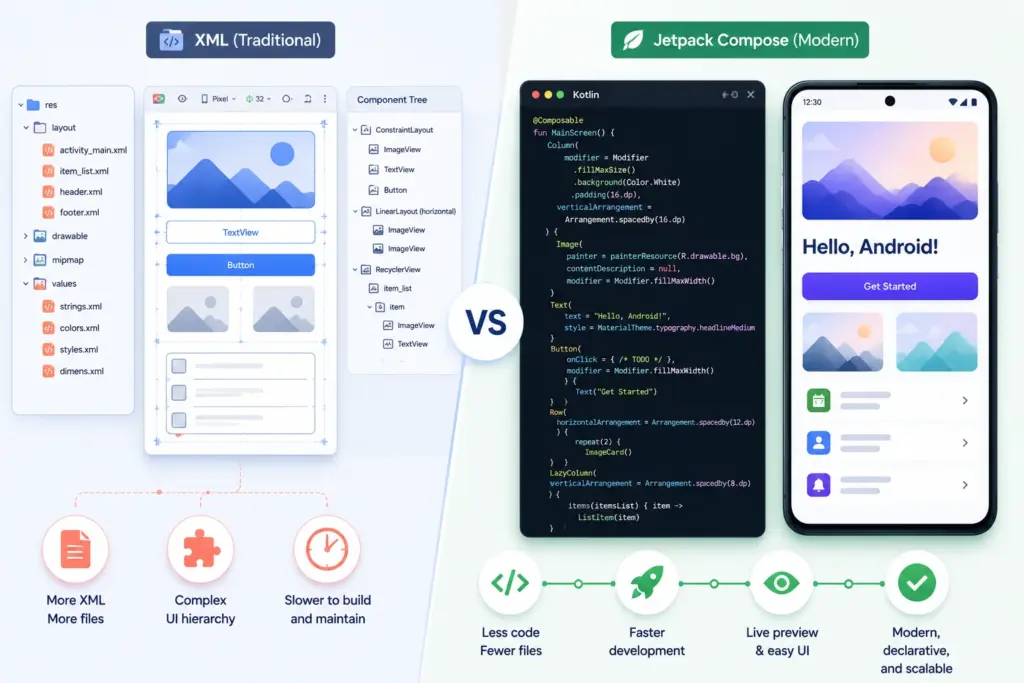
Learn Compose first. It’s Google’s current recommended toolkit for building Android UI, and nearly every new tutorial, sample, and course assumes you’re using it.
| XML (Traditional) | Jetpack Compose (Modern) | |
| How you build UI | Drag-and-drop Layout Editor, plus XML files like activity_main.xml | Kotlin functions that describe the UI directly in code |
| Where you’ll see it | Older apps, legacy codebases, some enterprise projects | New projects, current Google samples, most 2026 tutorials |
| Learning curve for beginners | Familiar if you know HTML, but requires switching between two files | Steeper at first, but you stay in one language the whole time |
| Live preview | Static preview pane | Interactive preview with real-time updates as you type |
That said, don’t skip XML entirely if you plan to work on an existing app someday. A huge number of production Android codebases still run on XML layouts, and knowing how to read one is a practical skill, not a nostalgic one.
How Is AI Already Changing Android Development in 2026?
This is the part most beginner guides still skip, and it’s arguably the biggest shift since Compose itself. Gemini in Android Studio is built directly into the IDE now, not bolted on as a side panel you have to remember to open.
In practice, that means inline code completion tuned to Android-specific patterns, plus plain-language explanations the moment you hit an error you don’t recognize. It also generates tests automatically. The most striking piece is “Agent Mode,” which can take a feature described in plain English, build it, and then run it in the emulator to check its own work.
Here’s the honest caveat: treat Gemini’s output the way you’d treat a capable but occasionally overconfident junior developer’s code. It’s genuinely useful for unblocking yourself and speeding up boilerplate, but review what it generates rather than accepting it blindly, especially anything touching permissions, payments, or user data.
If you want a structured, hands-on starting point rather than piecing tutorials together yourself, Android Basics with Compose is Google’s own free course, and it’s the one the company itself recommends for complete beginners. No credit card, no catch, just a self-paced curriculum that ends with you having built several real apps.
Why (and When) Should You Add Firebase to Your App?
Add Firebase once your app needs to remember something between sessions, whether that’s a user login, a saved preference, or shared data between users.
Firebase gives you authentication (email, phone, Google sign-in) plus two different cloud database options. This is where a lot of older guides give beginners slightly outdated advice: for years, tutorials defaulted to the Realtime Database.
Firebase’s own current guidance now points new projects toward Cloud Firestore instead, since it handles complex, queryable data and offline sync more gracefully. The Realtime Database still earns its keep for apps needing extremely low-latency syncing on simple data, think live cursors in a collaborative tool. But Firestore is the safer default if you’re not sure yet.
Setting it up is a matter of connecting your project through Android Studio’s built-in Firebase integration, which walks you through linking a Firebase project without leaving the IDE.
Beyond Firebase, you’ll eventually want to pull data from outside services too, weather, news, whatever your app needs. That’s where Retrofit comes in: a library that turns a web API’s JSON responses into Kotlin objects your app can actually use, without you hand-writing the parsing logic yourself.
One more thing worth knowing before you plan to publish: Google has been rolling out Android Developer Verification, a new identity check for developers distributing apps on certified Android devices. It’s a 2026 change that a lot of older tutorials won’t mention, so budget time for it if publishing is your eventual goal. If you’re not sure what to build yet, skip ahead to the project ideas near the end of this guide.
Start here today: open Android Basics with Compose and complete just the first pathway. It takes about three hours and ends with your first working app.
What API Level Should Your First App Target?
This is one spot where a lot of beginner guides oversimplify, so it’s worth separating two settings that get conflated:
- minSdkVersion is the oldest Android version your app will still install on. Set this low and you support more (mostly older) devices, at the cost of more compatibility code and fewer modern APIs available to you.
- targetSdkVersion is the API level your app declares it was built and tested against, and it’s the one Google Play actually enforces a deadline on. As of the 2026 policy, new apps and updates must target Android 16 (API level 36) by August 31, 2026 to be accepted on Google Play, with existing apps required to target at least Android 15 (API level 35); an extension to November 1, 2026 is available if you need more time.
For a beginner project, don’t fixate on the oldest possible minSdkVersion. Current distribution data shows the vast majority of active devices are already on Android 13 (API 33) or newer, so setting your minSdkVersion somewhere in the API 26–29 range is a reasonable, still-broad baseline for 2026; you’re excluding a shrinking sliver of very old hardware, not a meaningful chunk of your eventual users. Whatever you choose for minSdkVersion, remember that targetSdkVersion is a separate, non-negotiable number if you plan to publish: Android Studio’s default template will typically pre-fill a current, compliant target for you, so for a first project, the safest move is simply not to lower it.
How to Publish Your App to Google Play
Publishing is its own multi-week process, not a final button you press, so budget time for it rather than treating it as a same-day step once your app works.
- Create a Google Play Developer account. This costs a one-time $25 registration fee (not a subscription, unlike Apple’s $99/year developer program) and requires identity verification, including a government-issued ID for personal accounts.
- Build a signed Android App Bundle (AAB). Google Play requires the AAB format rather than a raw APK for new apps, and it needs to be signed through Play App Signing.
- Complete your store listing. This includes your app’s title, description, icon, screenshots, and a feature graphic, plus Google’s app content and privacy declarations.
- Run required closed testing. Personal developer accounts created after November 2023 must run a closed test with at least 12 opted-in testers for 14 consecutive days before Google will let you apply for a full production release plan for this timeline, since it can’t be rushed or skipped.
- Submit for review. New developer accounts typically see review take several days to about a week; established accounts with a track record are usually much faster.
Two 2026-specific details worth budgeting time for: your app’s targetSdkVersion needs to meet Google Play’s current requirement (Android 16/API 36 for new apps, discussed above), and Android Developer Verification, mentioned earlier in this guide, adds an identity-check step that a lot of older publishing tutorials don’t cover yet. All told, plan for something closer to three to five weeks from “my app works on my phone” to “my app is live on the Play Store,” most of which is the mandatory testing window rather than active work on your end.
Is There an Official Android Development Certificate?
Not for writing code, at least not anymore. Google’s Associate Android Developer certification, which used to be the closest thing to an official “I can code Android apps” credential, has been retired Google is no longer accepting new registrations for it, though certifications issued before retirement remain valid through their expiration date.
The certification Google currently offers and actively promotes is the Google Play Store Listing Certificate, but it’s important to be clear about what it actually tests: store listing optimization, Play Console policy compliance, and app marketing best practices, not app development skills. It’s a genuinely useful credential if you’re heading toward app marketing or ASO work, but it won’t demonstrate that you can build an app. If you want to show development skills specifically, a portfolio of real projects (see the project ideas below) currently does more for you than any single Google certificate.
Common Mistakes Beginners Make (and How to Skip Them)
A few patterns show up in almost every beginner’s first month, and each one is easy to fix once you know to look for it.
- Targeting the newest API only. Picking the highest available SDK version narrows the phones your app can run on. As covered above, a minSdkVersion in the API 26–29 range is a broad, safe baseline for most 2026 projects, and you can always raise it later once you understand your audience. Just don’t confuse this with targetSdkVersion, which Google Play requires you to keep current regardless.
- Cramming everything into one Activity. New developers often build a single giant screen instead of splitting logic across the four components you just learned. If one file is doing five different jobs, that’s a sign to break it apart.
- Skipping state management in Compose. Copying a composable function from a tutorial without understanding remember and mutableStateOf produces a UI that looks fine until the user rotates the phone. Learn state before you learn animation.
- Never testing on more than one screen size. An app that looks perfect on a Pixel emulator can break completely on a tablet or a cheap budget phone. Resize the emulator window before calling anything finished.
- Skipping version control from day one. Git feels unnecessary for a five-file project, right up until you delete the wrong folder. Start every project, even a throwaway one, with git init, and push it to a free GitHub repository. Beyond backup, a GitHub profile with a few real projects is one of the first things many employers and internship reviewers check, so building the habit early pays off twice.
None of these mistakes is embarrassing. They’re just tuition every Android developer pays early, and paying it on a two-hour toy project beats paying it on the app you actually care about.
What Should You Build First? Project Ideas That Actually Teach You Something
Resist the urge to plan your dream app first. A small, finished project teaches you more than an ambitious one you abandon at thirty percent.
- A counter app. Barely any logic, but it forces you to understand Compose state from the very first afternoon.
- A to-do list with local storage. Introduces Room, Android’s local database, without the added complexity of a network call.
- A weather app using a free API. This is where Retrofit clicks, since you’re finally pulling real data instead of hardcoded text.
- A quiz or trivia app. Good practice for navigating between multiple screens and passing data along with them.
- A simple habit tracker. Combines local storage, notifications, and a bit of UI polish, closer to something you’d actually keep using.
Build roughly in that order. Each project adds one new skill on top of the last, instead of throwing five unfamiliar concepts at you at once. If one of your project ideas is really a business idea in disguise and you want to validate it faster than a solo learning project would allow, that’s closer to what Boomdevs’ MVP development services are built for scoping and shipping a lean first version instead of a full learning-pace build.
Your Android Learning Roadmap
| Stage | Focus | What You’re Learning | Roughly When |
| 1. Foundations | Kotlin syntax, Compose basics, Activities | Variables, functions, composables, state | Weeks 1–2 |
| 2. First app | Counter app, to-do list | remember, mutableStateOf, Room (local storage) | Weeks 2–4 |
| 3. Networking | Weather app | Retrofit, JSON parsing, coroutines for async calls | Weeks 4–6 |
| 4. Architecture | Quiz app, habit tracker | Navigation, ViewModel, basic MVVM structure | Weeks 6–9 |
| 5. Production-readiness | Your own project | Hilt (dependency injection), WorkManager, testing, Firebase | Weeks 9+ |
What to Learn Next (Once the Basics Click)
Once you’ve built a couple of the projects above, these are the concepts that take you from “I can follow a tutorial” to “I can architect an app”:
- MVVM (Model-View-ViewModel). The dominant architecture pattern for Android apps, and the one most Google samples and job postings assume you already know.
- Coroutines. Kotlin’s built-in way to handle asynchronous work (network calls, database queries) without blocking the UI thread or drowning in callbacks.
- Room. Android’s local database library is the natural next step after you’ve used simple key-value storage.
- Hilt. Google’s recommended dependency-injection library is worth learning once your app has more than a couple of screens sharing data.
- WorkManager. For scheduling reliable background work (like periodic syncs) that needs to survive app restarts and device reboots.
- Testing (JUnit, Compose Testing). Easy to skip as a beginner, much harder to retrofit later; worth introducing on your third or fourth project rather than your first.
You don’t need all of these before you feel like a “real” Android developer. Most working developers picked them up roughly in this order, project by project, rather than studying them upfront. And if you get to the point where a project has outgrown a solo learning exercise, into something that needs production-grade architecture, a team, and a real timeline, that’s the same shift Boomdevs’ custom software development work picks up from.
Not Ready to Build It Yourself? Here’s the Other Path
Everything above assumes you’re learning Android development hands-on, and that’s genuinely the right call for a side project, a resume-builder, or just curiosity. But if you already have a specific app idea for a business and the priority is shipping it well rather than learning the stack along the way, it’s worth knowing that’s a service, not just a solo project: Boomdevs’ consulting team advises on platform selection and architecture for iOS and Android products specifically, and can scope a build with an engineering team rather than a learning curve attached. Before you decide, it also helps to know what an Android build costs.
Frequently Asked Questions
Is there a free beginner’s guide to Android development?
Yes. Google’s own Android Basics with Compose is free, self-paced, and requires no prior programming experience. It’s also the course Google itself points new developers toward first.
Which language is best for beginners in 2026, Kotlin or Java?
Kotlin. It’s the default language in every new Android Studio project template, has official Google backing, and its concise syntax makes it noticeably friendlier for a first language than Java.
Can I get a certificate for Android development?
Currently, Google’s active credential is the Google Play Store Listing Certificate, which validates your knowledge of building an effective Play Store listing. It’s a different focus than writing code, so pair it with hands-on project work if you want to demonstrate development skills specifically.
What are the four main components of an Android app?
Activities, Services, Broadcast Receivers, and Content Providers. Together they cover everything from what the user sees, to background tasks, to system-wide event handling, to sharing data between apps.
How much RAM do I actually need for Android Studio in 2026?
Eight GB is Google’s stated minimum for running Android Studio alone. If you plan to use the built-in emulator too, that minimum rises to 16 GB, with 32 GB recommended for smoother, professional-grade work.
What minSdkVersion should a beginner project use?
There’s no single right answer, but for most 2026 beginner projects, a minSdkVersion somewhere in the API 26–29 range is a reasonable default broad enough to cover almost all active devices without forcing you to write extra compatibility code for very old Android versions. This is a separate setting from targetSdkVersion, which Google Play requires you to keep current (Android 16 / API 36 for new apps as of August 2026) regardless of what you choose for minSdkVersion.
How much does it cost to publish an app on Google Play, and how long does it take?
The Google Play Developer account itself is a one-time $25 fee, not a recurring charge. The bigger factor is time, not money: personal accounts must run a 14-day closed test with at least 12 testers before Google allows a full production release, plus a review period on top of that, so realistically budget three to five weeks from a finished app to a live Play Store listing rather than assuming it happens overnight. If you’re building for a business and not just for practice, the $25 fee is a small part of a realistic mobile app budget.