How to Add Social Media Icons to WordPress Menu (in 2024)
For those who are new to blogging and eager to enhance their WordPress website, this article offers valuable guidance on how to add social media icons to the WordPress menu. By following the straightforward steps outlined below, you can seamlessly integrate social media icons into your WordPress menu, regardless of the theme you’ve chosen. This user-friendly guide aims to assist you in navigating the process smoothly and effectively.
Why add social media icons to the WordPress menu?
Everyone in this generation has at least one social media account. As a result, using social media to engage with your audience might be a great idea. However, if you include a link to your social profile on your website, but it appears at the end of your content or in the footer then your website’s click-through rate to social media may be lower. You should include a link to your social media accounts in the header so that your users can find them quickly.
It will provide you with a good look as well as certain advantages. In this post, I’ll show you how to add a social icon to your Menu so that your users can easily access your social media link and interact with you on social media.
How to Add Social Media Icons to WordPress Menu
There are a few options for incorporating social icons into the Menu. If your theme offers a built-in option to display a social icon in the Menu or top menu bar, you can easily add it to the Menu. Don’t worry if you don’t have the theme option; I will show you how to add a social icon to the Menu. And, no matter what themes you have, this technique will work for all themes. On the Menu, I’ll add the Font Awesome icon. You’re probably familiar with the concept of “Font Awesome.” Font Awesome is a website that has over a thousand icons. You can easily add those icons to your website.
So, let’s have a look at how to include an icon in the Menu.
Step 1: Go to the Font Awesome website.
First, you just need to go to the Font Awesome website. You can find the Font Awesome webpage by doing a Google search. Alternatively, you can go straight to the website by clicking here.
Step 2: Find and Select the Social Icon.
It’s time to move on to the following stages after you’ve entered the website. Right now, you have to find the social icon. To find the icon, use the search option. Once you’ve found the icon, click on it.
Step 3: Change the icon Color, Size, and Copy the URL.
1. Select Desired Color: In the color panel, choose the desired color for your icon. If you’re aiming for an official color, you can find the color code by searching on Google, e.g., “Facebook icon color code.”
2. Insert Color Code: Insert the chosen color code in RGB, HSL, or HEX format into the color panel. Ensure the color complements your website’s design.
3. Adjust Size: Customize the size of the icon using the “Default Size” option. You can modify the size according to your preference.
4. Copy HTML Code: Hover over the HTML text representing your customized icon. Hovering over the HTML text will reveal the phrase “Copy Code Snippet“. To copy the HTML text, you have to click on it.

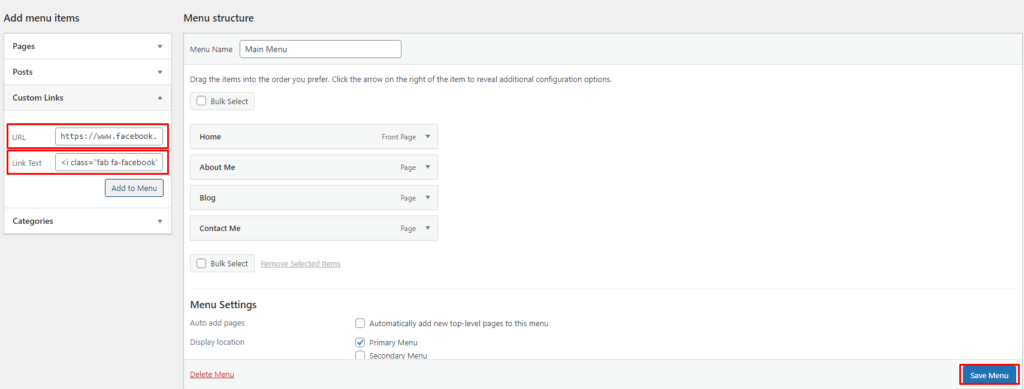
Step 4: Paste the URL.
Go to the WordPress dashboard and navigate to Appearance>>Menu after copying the HTML. Now you have to add your social media site as a menu item. To do so, go to the Custom Link and click on it. In the URL box, paste the URL of your social media site, and in the link text box, paste the HTML code you copied from the Font Awesome website. Then select the option to Add to Menu. Also, remember to save your settings. Go to your website after saving the settings, and you’ll notice a clickable social icon in the menu section. You can add as many social icons as you want and design your WordPress menu.
If it doesn’t work, then follow the below steps.
Sometimes It doesn’t work because the themes don’t have the Font Awesome CSS and fonts installed. You must declare CSS 1st on your website. To do so, you have to paste a few lines of code in your header.
By navigating to the theme editor, you can paste the code. However, if you are not a techie, I recommend using the WPCode plugin. It allows you to add code to the header without having to use the theme editor. And if you discover something is wrong, you can simply delete the code from it.
Install and activate the plugin. Now go to the code snippet section, where you will find the Header and Footer options.

Go there and paste the code which is given below.
<link rel="stylesheet" href="https://cdnjs.cloudflare.com/ajax/libs/font-awesome/5.15.4/css/all.min.css"/>After inserting this code check out your website. You will see the social icon is now visible on your site.
WarpingUp
I discussed how to include a social icon in your Menu in this article. This is a straightforward method that may be performed no matter what theme is being used. If you have any further questions, please leave them in the comments section, and I will gladly answer them.
You can read the following articles also :
Best font plugin for WordPress 2021
How to Make WordPress Site Private in 2021

Author: EditorialStaff
The Editorial Staff of BoomDevs is a team of WordPress professionals, lead by Shamiul Bishal, who provides guidance and support.